Events & Ticketing
Build event pages, sell tickets, run box-office sales, and manage the door, all in one place. This guide covers everything from creating an event to embedding checkout on your own site, dynamic pricing, waitlists, reserved seating, wallet passes, refunds, and QR check-in.
Creating Events
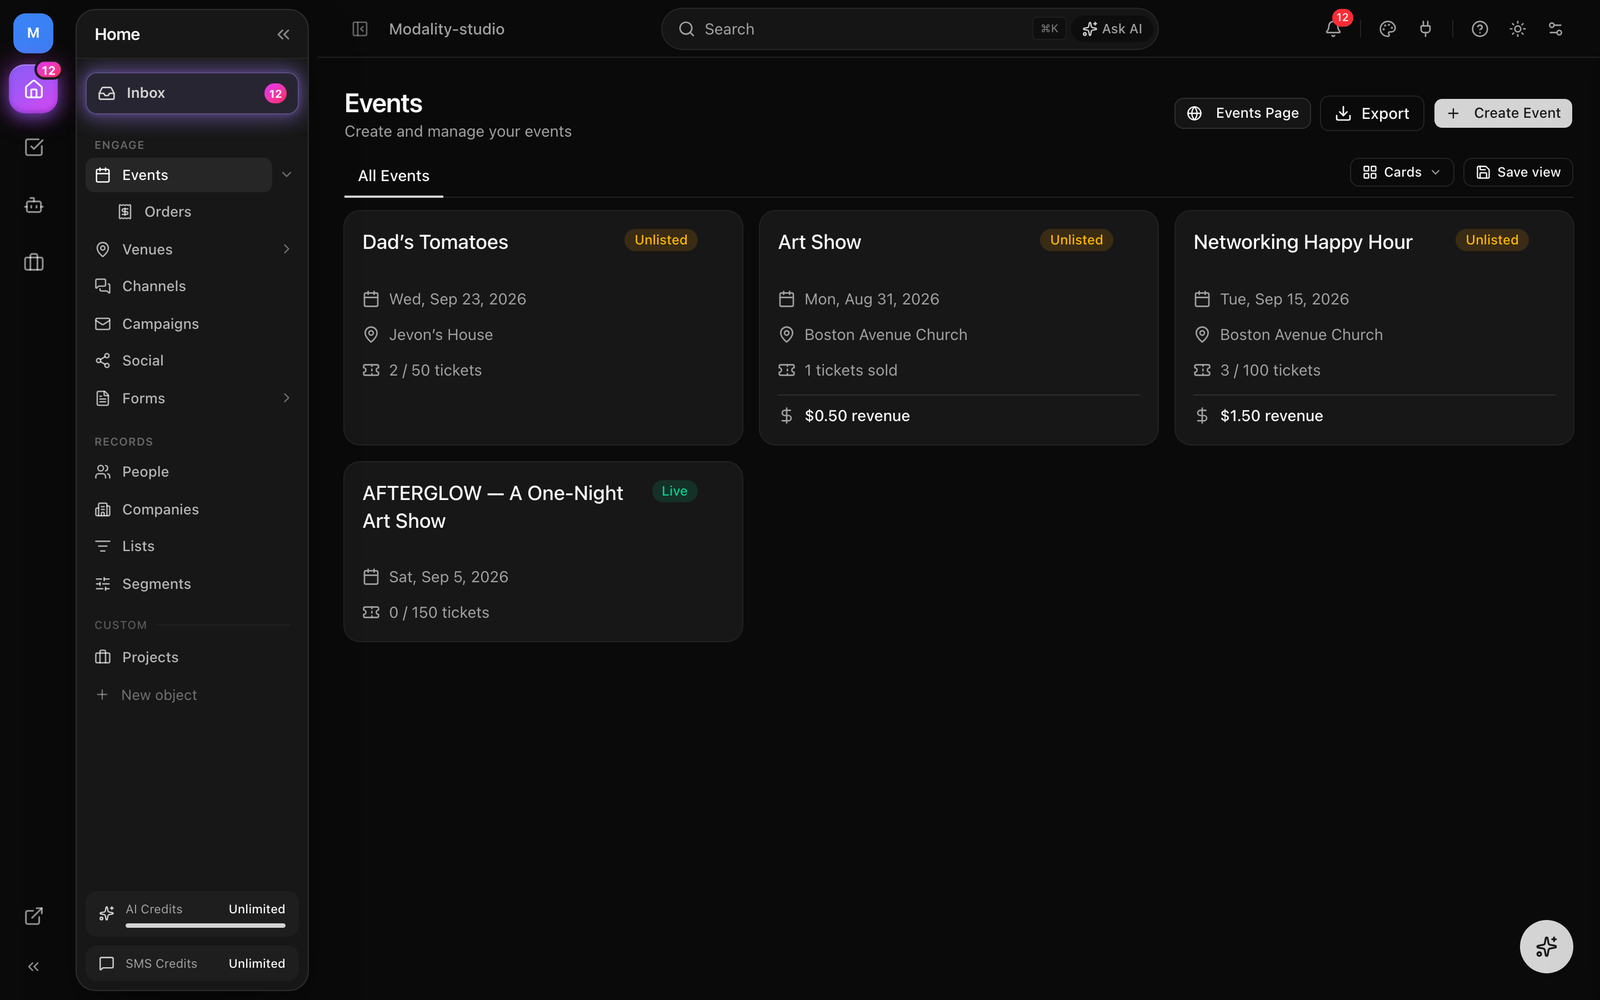
Events are the foundation of Modality's ticketing and promotion features. Each event has its own public page, ticket types, order management, and analytics.
How to Create an Event
- 1
Navigate to Events
Click "Events" in the sidebar. The events list shows all your events with their status, dates, ticket counts, and revenue.
- 2
Click "New Event"
Enter the basics: title, description (rich text), start and end date/time, timezone, and venue name with an optional address. If you add a city/region/country and coordinates, the event can also surface in Discover (see Visibility & Discovery below).
- 3
Add event media
Upload a cover image and optional gallery images, add an artist/performer lineup with names, bios, and photos, and embed Spotify or Apple Music tracks or a YouTube/Vimeo video.
- 4
Configure ticket types
Add one or more ticket types with pricing, capacity, sales windows, and descriptions. See Ticket Types below.
- 5
Go live
Events start as
DRAFT. When you're ready, open the Go Live dialog to choose a visibility level and publish. Publishing makes the public page live and enables ticket sales.
Ticket Types
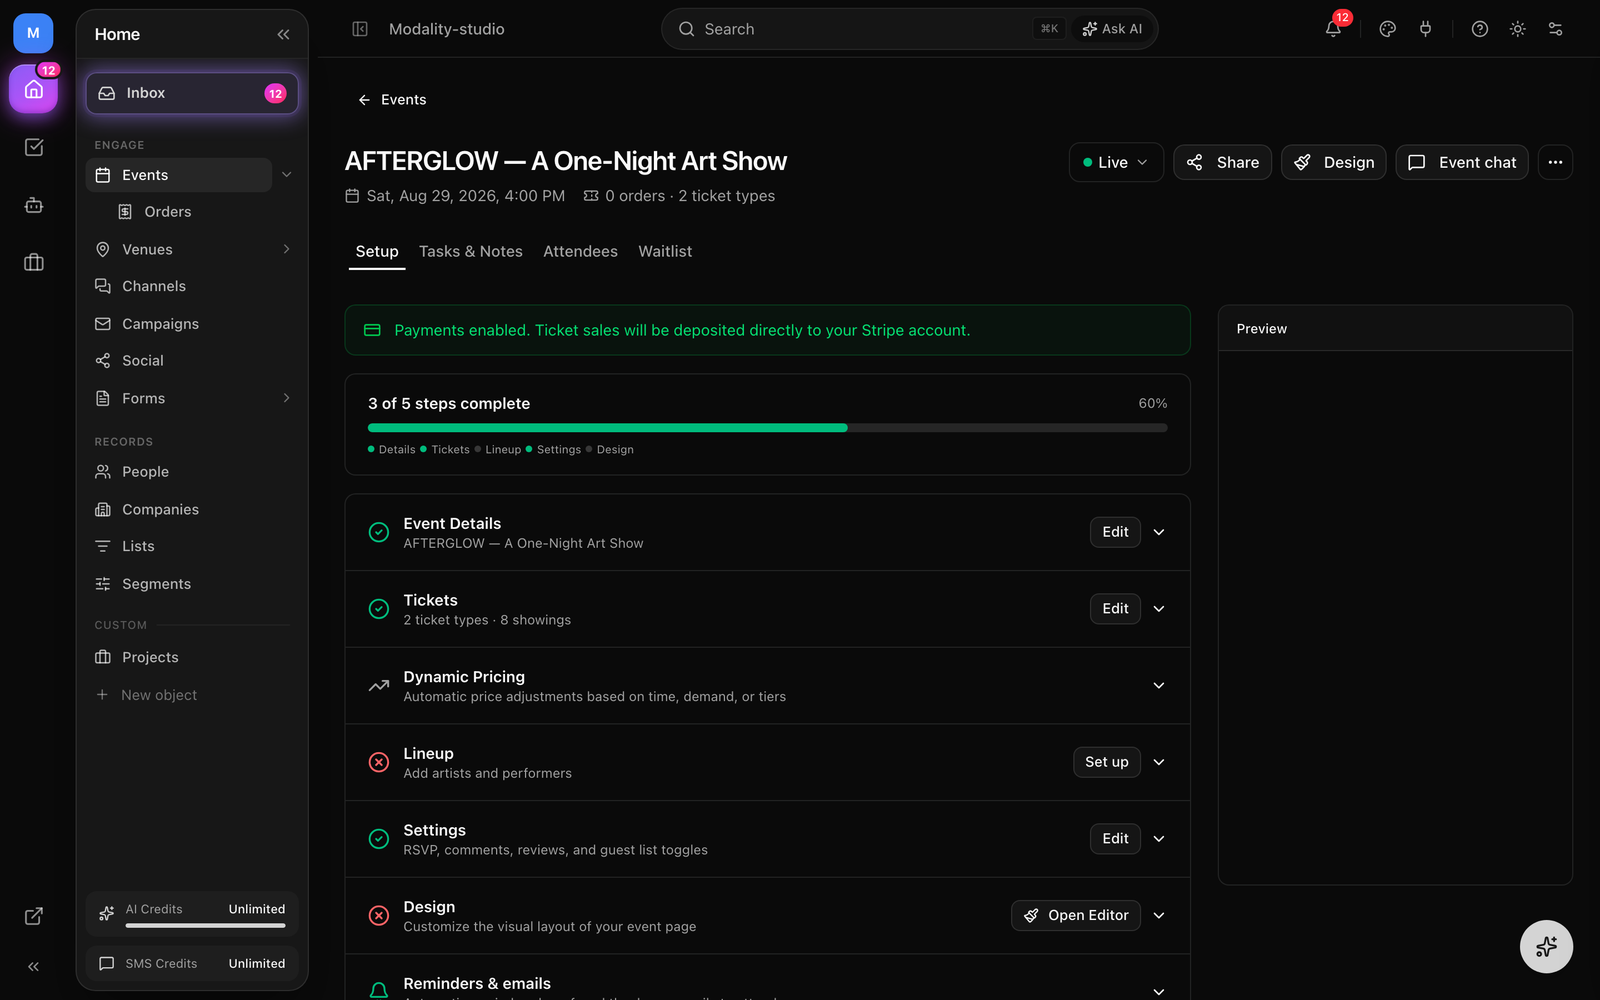
Each event can have multiple ticket types to offer different experiences or pricing tiers. Ticket types support sales windows, availability states, required base tiers, per-showing scoping, and drag-to-reorder.
How to Add a Ticket Type
- On the event detail page, open the "Ticket Types" section and click "Add Ticket Type."
- Enter a name (e.g., "General Admission," "VIP," "Early Bird").
- Set the price. Enter
0for free tickets. (Prices are stored internally in cents; you type dollars.) - Set the capacity, the maximum number of tickets available for this type.
- Optionally set a sales start and sales end so the tier only sells during a window.
- Add an optional short description (shown under the name on the public page).
- Click Save. The ticket type appears on the public page immediately (once the event is published).
Availability & Advanced Options
- Status, a tier can be
ACTIVE,PAUSED(hidden / temporarily off sale),SOLD_OUT, orCLOSED. When one tier sells out, the others remain available. - Required base tier, mark a tier as required and the cart automatically keeps its quantity at or above the total of any add-on tiers (e.g. a base admission that every add-on must accompany).
- Per-showing scoping, for recurring / multi-showtime events, scope a tier to specific showings so it only sells for those dates (see Recurring & Multi-Showtime Events).
- Drag to reorder, reorder tiers by dragging; the order is saved and reflected on the public page.
Dynamic Pricing
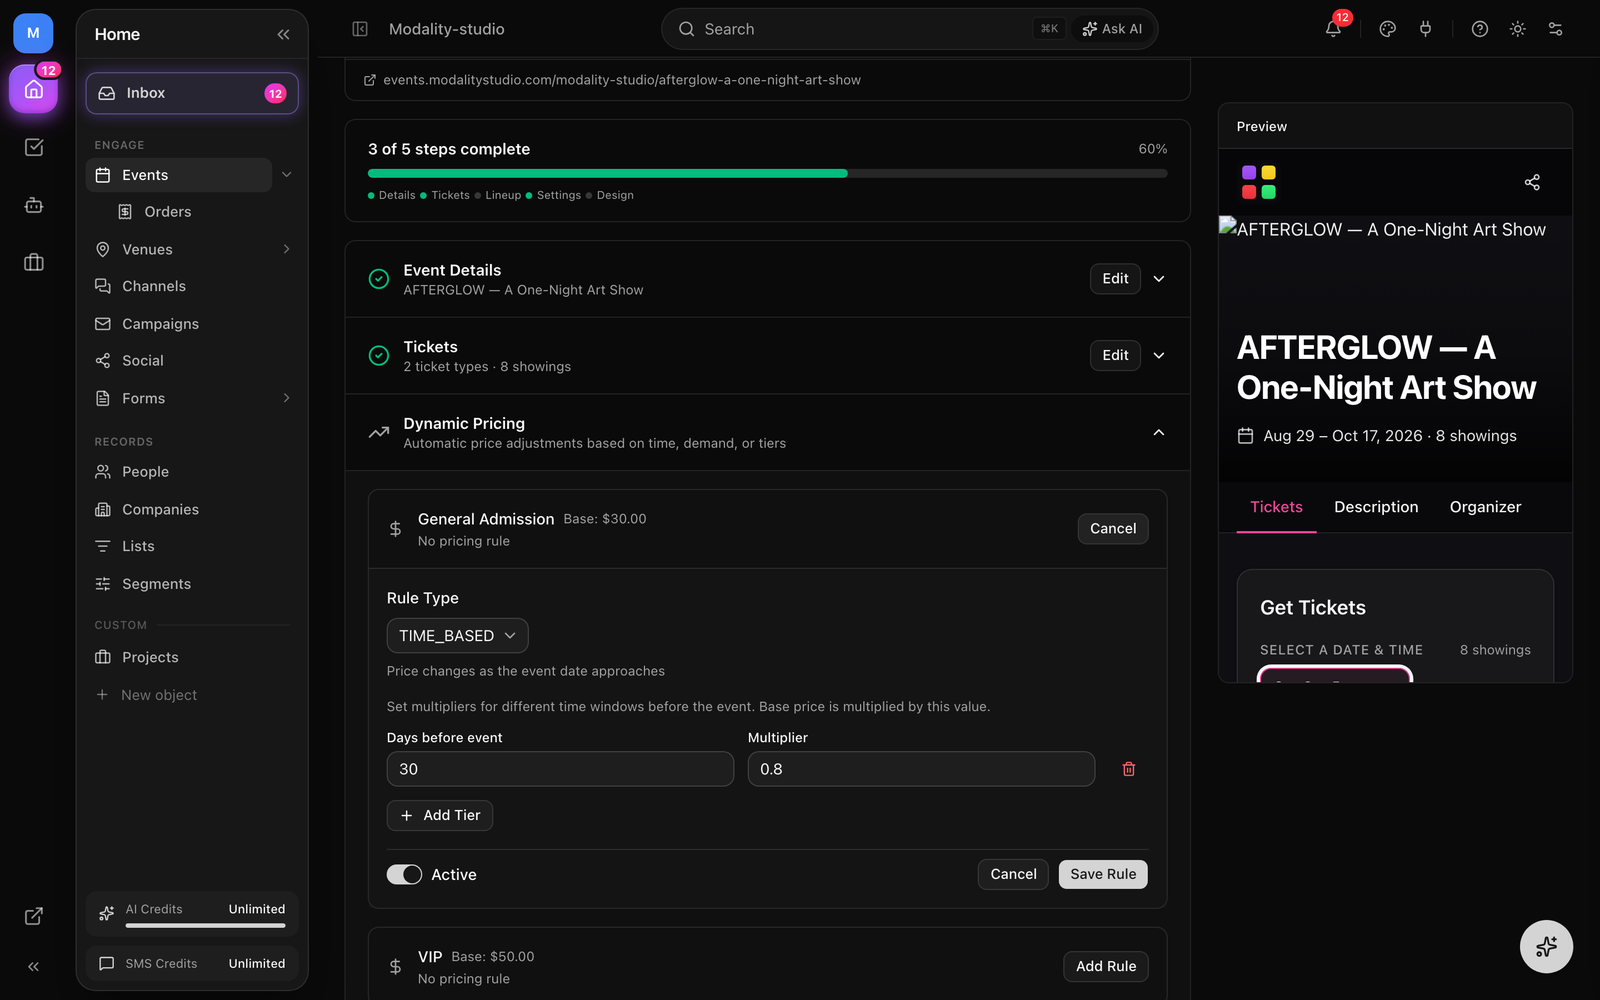
Attach a pricing rule to a ticket type to change its price automatically. Rules are resolved at both online checkout and box-office (POS) sales, so the price a buyer sees always reflects the current rule. Each ticket type can carry one active rule of one of three kinds:
- Time-based, early-bird ramps defined by days before the event. Each tier applies a price multiplier (e.g. 0.8× until 30 days out, full price after), so the price steps up as the date approaches.
- Demand-based, price by percent sold. Define tiers (e.g. +10% once 50% sold, +25% once 80% sold) and the price rises as inventory depletes.
- Tiered, manually scheduled price changes: named tiers each with a price and an optional end time, so you control exactly when the price switches.
Configure rules in the pricing-rule editor on the event's ticket type. The public page shows the effective price (and any savings versus the original) automatically.
Promo Codes & Discounts
Create discount codes that buyers enter at checkout. A code can be:
- Percentage off the order total, or a fixed amount off (capped at the order total).
- Limited by a max uses count, redemptions are counted atomically, so a code can never be over-redeemed under concurrent checkouts.
- Scoped to a validity window (valid-from / valid-until).
- Per-event (only that event) or workspace-wide (any event).
At checkout the buyer enters the code; if it's active, in-window, applicable to the event, and under its usage cap, the discount is applied to the total before payment. Codes are case-insensitive.
Screenshot: creating a promo code (percentage vs fixed, max uses, validity window) and a checkout with the discount line applied.
Demo GIF / screenshot to be added
Recurring & Multi-Showtime Events
One event can run across many dates. Build a repeating series or add individual showtimes, and each showing carries its own capacity and seat inventory.
- Recurrence rules, generate a series with a daily, weekly, or monthly rule (with an interval, e.g. every 2 weeks), ending on a date or after a count. A series expands to up to 200 occurrences.
- Individual showtimes, add specific dates one at a time; each becomes its own showing with a per-showing label (e.g. "Night 2").
- Per-showing inventory, capacity and seats are tracked per occurrence, and ticket types can be scoped to specific showings.
- Buyer picks a showing, on a multi-showtime event the buyer chooses which showing to buy for before selecting tickets.
Reserved Seating & AI Seat Maps
Beyond general admission, Modality supports fully reserved seating. Build a venue layout with sections, rows, and individual seats, then sell assigned seats with per-seat holds so two buyers can never claim the same seat. Seats are held during checkout and released automatically if the order isn't completed.
AI-generated seat maps
Don't have a digital seat map yet? Upload a photo or screenshot (PNG, JPEG, or WebP) of your venue's floor plan and Modality's AI generates the seating layout, sections, rows, and seats, for you to fine-tune in the editor, instead of placing hundreds of seats by hand.
GIF: AI seat-map generation, upload a floor-plan photo, watch sections/rows/seats appear, then fine-tune a section in the seat editor.
Demo GIF / screenshot to be added
Waitlists
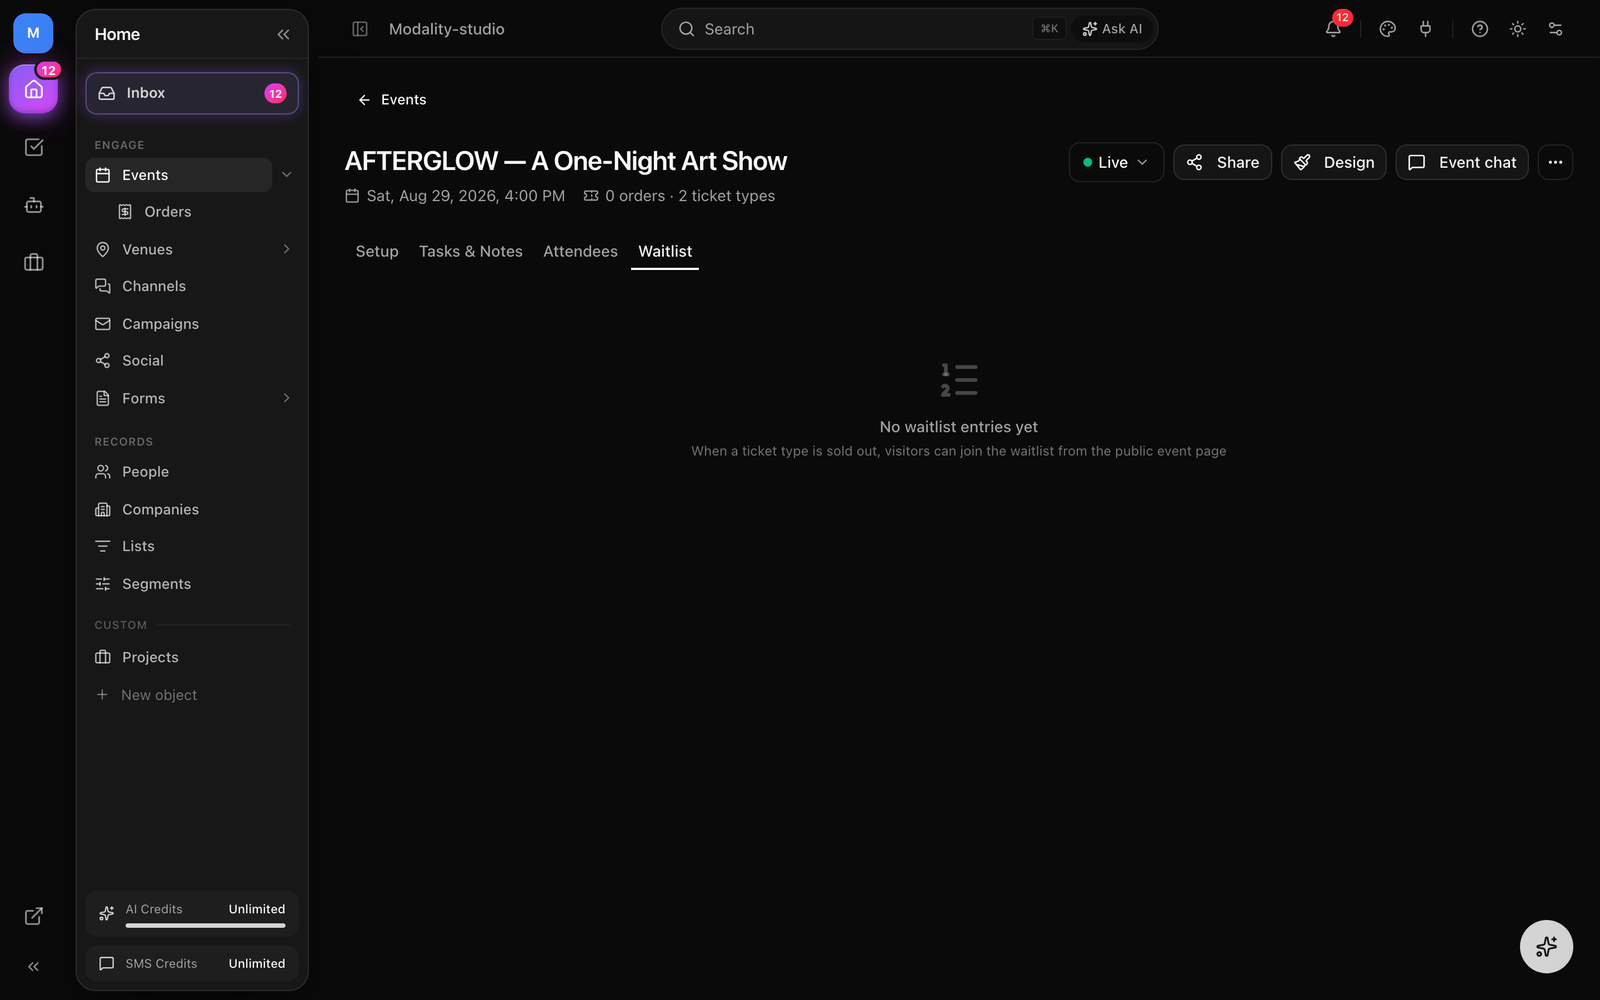
Keep capturing demand after a tier sells out. Each ticket type has its own waitlist, and entries move through a clear lifecycle:
- Waiting, someone joined the waitlist for a sold-out tier and holds a position in line.
- Offered, you send a time-limited offer; the entry records when it was offered and when the offer expires.
- Converted, the guest completed a purchase from the offer.
- Expired / Cancelled, the offer lapsed or the guest withdrew.
Manage all of this from the waitlist panel on the event: review who's waiting, send offers, and track conversions.
Referral Programs
Reward attendees who bring friends. Create a referral program (per-event or workspace-wide) from the referral program panel:
- Choose a reward type: percentage discount, fixed discount, or account credit, and set its value.
- Set a minimum referrals threshold and an optional cap on total rewards.
- Each referrer gets a unique referral code to share; qualifying referrals auto-grant a reward promo code.
Public Event Pages
Published events get a public page at /event/your-event-slug, designed to convert visitors into ticket buyers. The slug is auto-generated from the title and can be customized in event settings. Share the URL, embed it (see below), or distribute it via campaigns.
What the Public Page Includes
- Hero, cover image, event title, date, and venue.
- Ticket selection, ticket cards with pricing, descriptions, quantity selectors, and a "Get Tickets" CTA.
- About, rich-text event description.
- Lineup, performer cards with photos, bios, and Spotify/Apple Music embeds.
- Video, Gallery, Venue map, Organizer, and community sections (see the section list next).
Visual Page Editor
The visual page editor lets you customize your public event page with drag-and-drop. Rearrange sections, toggle visibility, edit content inline, and preview on desktop and mobile, without writing code.
Section Types
The editor supports 12 section blocks that you can add, reorder, and toggle on or off:
- Tickets, ticket cards with pricing, descriptions, and quantity selectors.
- RSVP, a guest RSVP form (free events or interest collection; supports approval-gating, see below).
- Chip-in, split-cost / donation buttons that link to Venmo, Cash App, or PayPal (self-reported, no platform fee).
- About, rich-text event description.
- Lineup, artist/performer cards with photos, bios, and music embeds.
- Video, an embedded YouTube or Vimeo player from a pasted URL.
- Gallery, a photo gallery with lightbox viewing.
- Organizer, organizer info with logo and description.
- Venue, venue name, address, and map.
- Guest List, confirmed guests shown publicly.
- Reviews, attendee reviews / testimonials.
- Comments, an event discussion section.
GIF: the visual page editor drag-reordering sections (including the Video and Chip-in blocks) and toggling the desktop/mobile viewport preview.
Demo GIF / screenshot to be added
Theme, Viewport & Inline Editing
The Theme tab customizes colors, fonts, logo, and cover image (pulling defaults from your brand kit) and previews in real time. Toggle between desktop and mobile viewports to check both layouts. Add, edit, and remove tickets, artists, and gallery images directly in the editor; visibility toggles hide a section without deleting its content.
Checkout & Payments
Ticket payments run on Stripe. Paid sales use Stripe Connect direct charges against your connected account, with the platform service fee collected as an application fee. There are two checkout surfaces:
- Hosted checkout (default on the public page), the buyer is redirected to Stripe's secure hosted page to pay, then returns to a confirmation page.
- Embedded checkout (used inside the embed/iframe), Stripe Embedded Checkout renders inside the widget, so payment never leaves the host site (see Embedding Events).
How Checkout Works
- The buyer selects ticket types and quantities on the public page (or in the embed).
- They enter their name and email (and any other captured contact fields).
- For paid tickets, they pay via Stripe, hosted redirect on the public page, or Embedded Checkout in the widget.
- For free tickets, the order completes immediately without Stripe.
- They land on a confirmation page with order details, ticket QR codes, and wallet-pass buttons.
- A confirmation email is sent automatically with ticket details.
Embedding Events on Your Website
Sell tickets and collect RSVPs directly from your own site. Open the Share dialog on an event, go to the Link tab, and copy a snippet. Drop it into any page along with the lightweight loader script. Three modes are generated:
- Popup button, a "Get Tickets" button on your page opens a compact ticket/RSVP modal. Payment via Stripe Embedded Checkout happens right in the popup.
<button data-es-event="slug" data-es-mode="popup">Get Tickets</button> - Inline widget, renders the ticket/RSVP widget in the page and auto-resizes to fit its content.
<div data-es-event="slug"></div> - Basic iframe, a simple fixed-height iframe of the widget.
The popup and inline snippets load /embed.js, which manages the modal, auto-resize, and theeventstudio:* message protocol between your page and the widget. Add data-es-ws="your-workspace-slug" so the embed resolves the right workspace. You can embed a form the same way with data-es-form.
GIF (FLAGSHIP, currently no media): the Share dialog generating an embed snippet, then the 'Get Tickets' popup button on an external site opening the compact widget and completing Stripe Embedded Checkout inside the modal.
Demo GIF / screenshot to be added
Box Office & In-Person Sales
Sell at the door from the mobile app. Box-office orders are minted synchronously (the ticket exists the moment the sale is recorded) and are stamped with the POS channel and the tender used. Supported tenders:
- Cash, record a cash sale.
- Comp, a free/complimentary ticket ($0 charged).
- External card, a card taken outside the app (recorded, not charged here).
- Tap to Pay, contactless card charged on-device (card-present, dev-restricted rollout).
- Card reader, a dedicated Stripe reader (same card-present rail as Tap to Pay).
- Keyed-in card, manually entered card details via the payment sheet.
POS respects the same rules as online checkout: per-showing tier scope, the required-base floor, and dynamic pricing. Card-present charges are confirmed with Stripe before the ticket is minted, and capacity is released if anything fails.
Wallet Passes
On the confirmation page, each ticket offers Download QR alongside Add to Apple Wallet and Add to Google Wallet buttons, so attendees can carry their ticket in their phone's wallet.
APPLE_PASS_CERT, APPLE_PASS_KEY, APPLE_WWDR_CERT, APPLE_PASS_TYPE_ID, APPLE_TEAM_ID); the Apple button appears once they're present.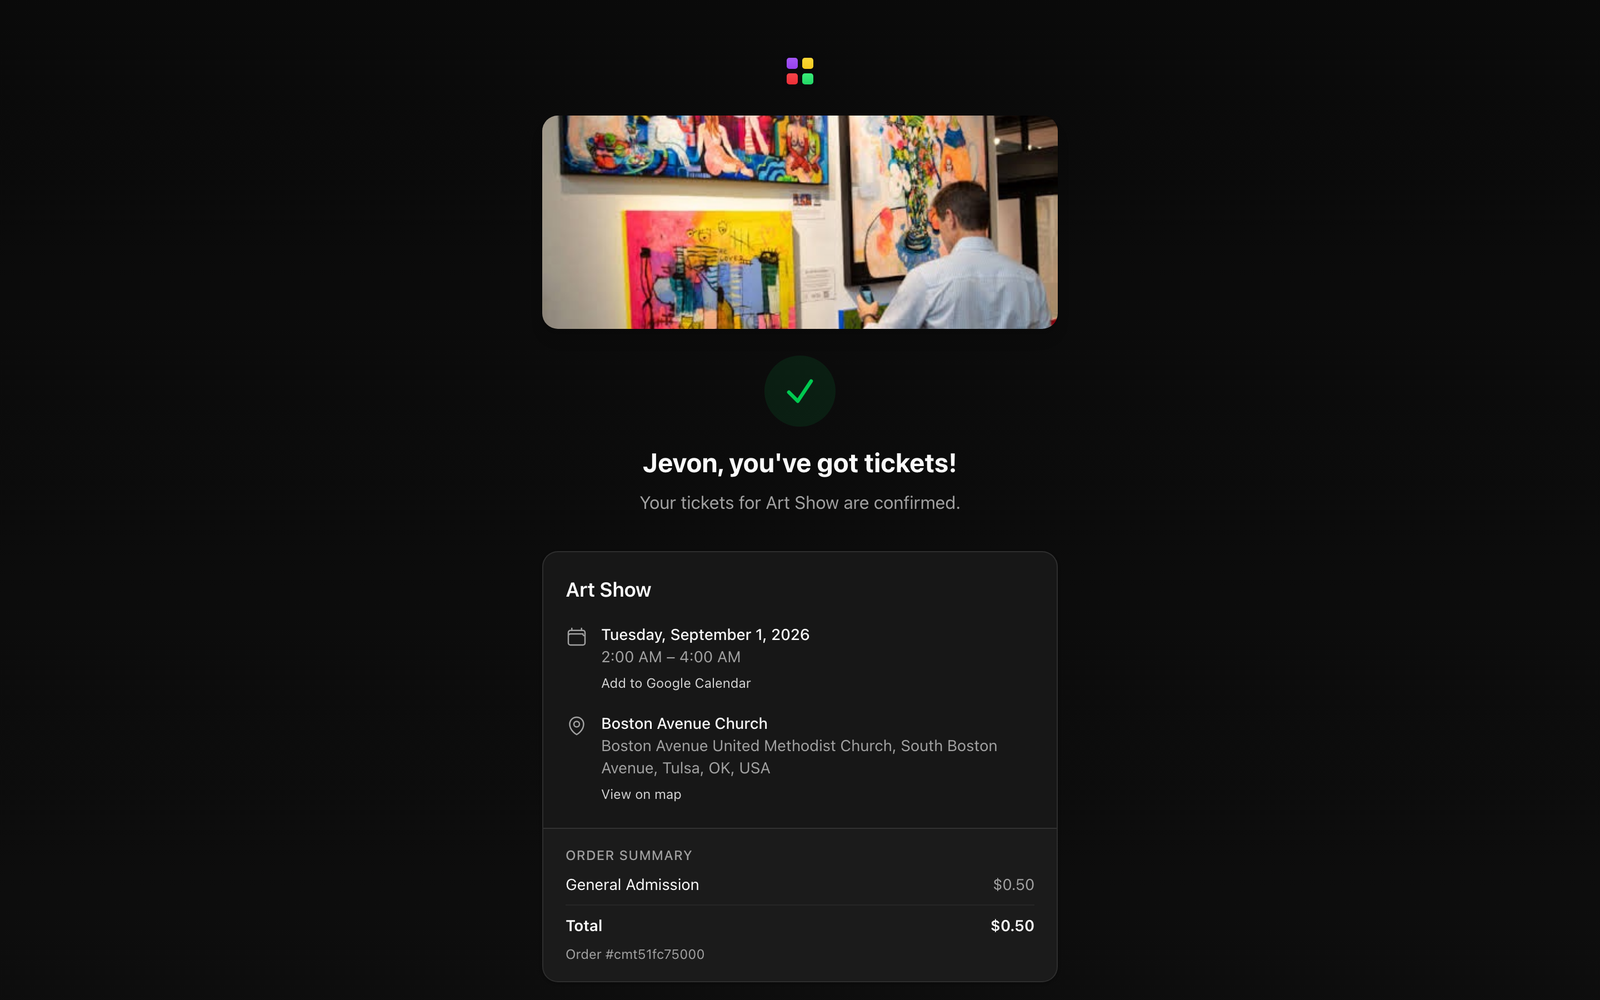
Refund Policies
Set a per-event refund policy (shown to buyers before purchase). Choose from:
- Organizer's discretion (default), refunds are handled case-by-case by the organizer.
- All sales final, no refunds.
- Refundable until 7 days before the event.
- Refundable until 24 hours before the event.
When you issue a refund, the buyer is emailed automatically with the refund details.
Event Visibility & Discovery
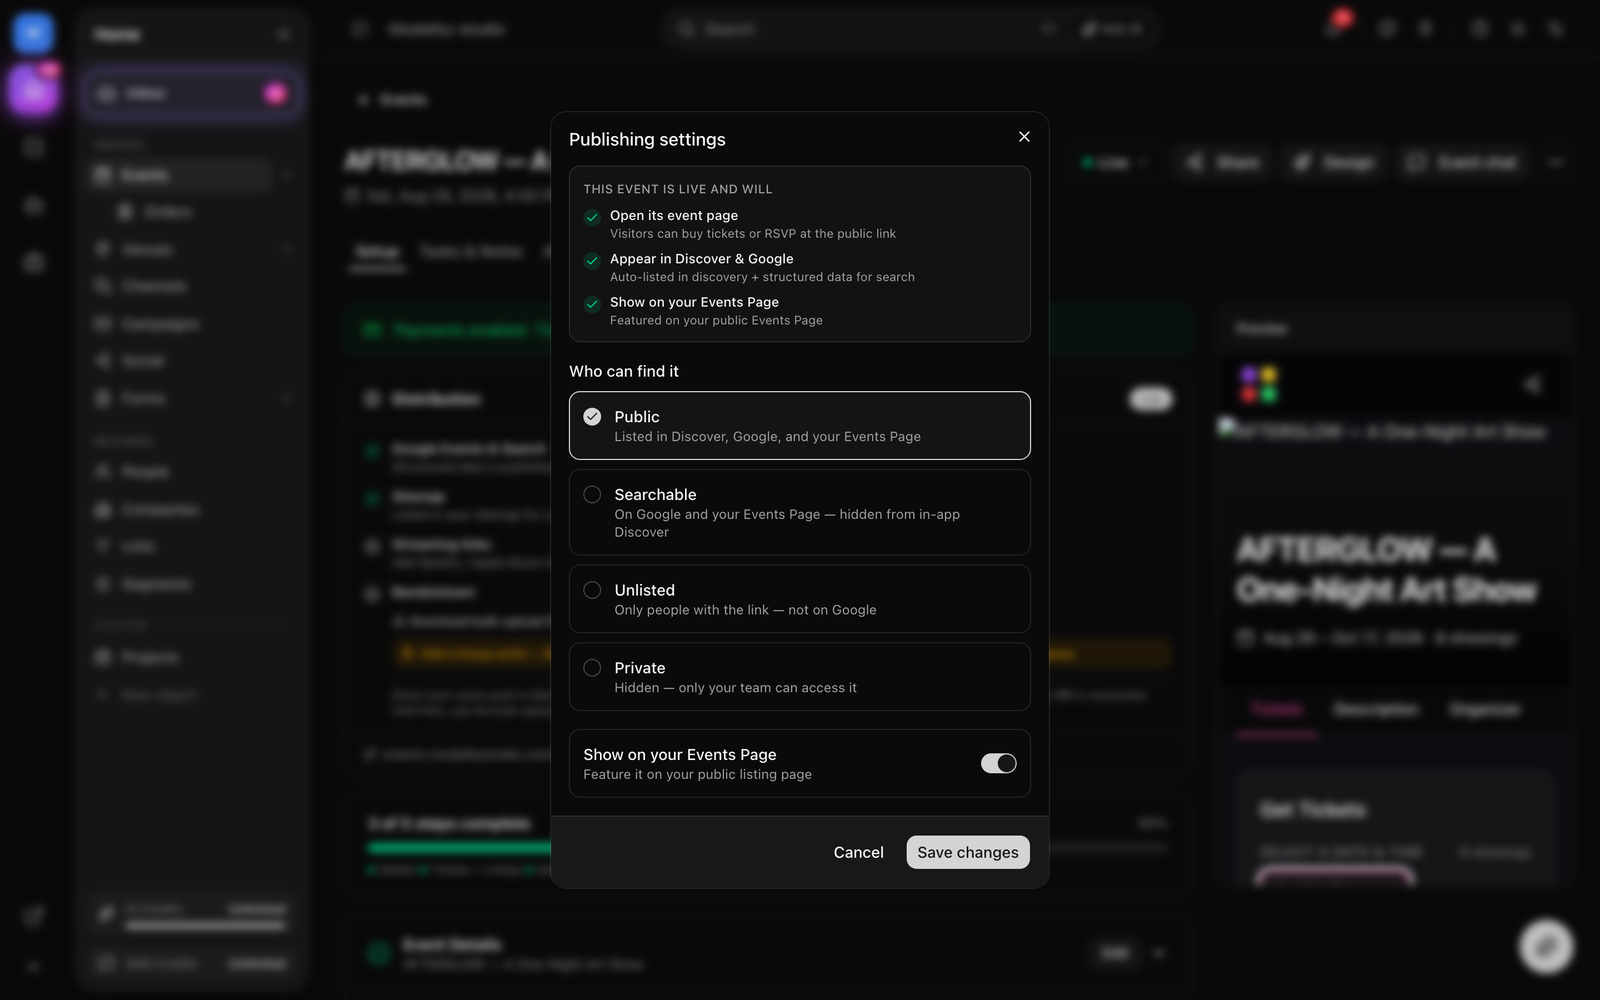
The Go Live dialog controls who can find your event. Pick one of four visibility levels, plus a toggle for featuring it on your public Events Page:
- Public, listed in in-app Discover, on Google, and on your Events Page.
- Searchable, on Google and your Events Page, but hidden from in-app Discover.
- Unlisted, reachable only by direct link; not on Google or Discover.
- Private, hidden; only your team can access it.
Public events with a city/region/country and coordinates surface in the in-app Discover feed and on the discovery map (category powers filtering). The Show on your Events Page toggle features a Public event on your workspace's public Events Page.
Approval-Gated Events (Approve-then-Pay)
Turn on Require approval to review guests before they get in. Instead of an instant ticket, a guest submits a request (RSVP), the host approves or declines it, and only approved guests can complete checkout.
- Enable Require approval on the event.
- A guest requests to attend, their RSVP is created in a pending state.
- You approve (or decline) from the dashboard; declined requests stay recorded so they don't resurface as pending.
- Approved guests are notified and can then complete ticket checkout (approve-then-pay).
- Approved guests appear on the door check-in list and can be checked in like ticket holders.
Check-In: Scanner, Staff Links & Mobile App
Every ticket gets a unique QR code. Modality gives you three ways to work the door, all backed by the same server-of-truth redemption that's idempotent per scan (a retried scan of the same code never double-counts).
- Dashboard scanner, open
/events/[id]/check-infor a live camera scanner (using the browser's barcode detector), a manual ID lookup for codes that won't scan, and a running checked-in count for the session. - Mobile scanner app, scan tickets from the Modality mobile app; the redeem queue is safe to retry offline because redemption is idempotent on the scan id.
- Staff Links, generate no-login, shareable links (Share dialog → Staff tab) for door staff to scan tickets or search the guest list at
/staff/<token>, with no app or account required. Each link tracks its own scan count and can be revoked.
On a valid scan the ticket flips to USED and check-in time is recorded; a second scan reports "already redeemed" to prevent duplicate entry; invalid or cancelled tickets show an error. Approved RSVP guests check in the same way (with a bounded plus-ones counter), so RSVP-only and ticketed events share one door workflow.
![The dashboard check-in scanner (/events/[id]/check-in) with the live camera view, manual ID lookup, and running checked-in count, plus a Staff Link shown in the Share dialog's Staff tab.](/docs-media/checkin.png)
Sharing & Distribution
The Share dialog is the hub for getting an event out. Its tabs cover:
- People, grant teammates or collaborators access to the event at a chosen access level, and revoke it later.
- Link, copy the public link, download the embed snippet (see Embedding Events), and grab QR codes: a view-page QR that opens the event, and (for ticketed events) a Buy ticketsQR that jumps straight to checkout, both printable.
- Staff, create and manage no-login Staff Links for the door (see Check-In).
Events also support reminders (configure when attendees are reminded before the event) and a Bandsintown export/sync panel for pushing listings to Bandsintown. Note that tickets can also be transferred to another holder (the original ticket is marked transferred).