Campaigns
Reach your audience by email, SMS, and social from a single campaign. Modality shares one audience layer, one set of merge tags, and one analytics view across every channel, whether you send natively through Modality or hand delivery off to a connected ESP. This guide walks through the whole flow, from creating a campaign to reading its results.
Channels: Email, SMS & Social
A campaign can carry content for more than one channel. The same audience, merge tags, and analytics layer apply throughout, so you build an audience once and speak to it wherever your people are:
- Email, the visual editor, templates, AI Campaign Studio, dynamic blocks, and full open/click analytics. Sent natively through Modality or via a connected ESP.
- SMS, a plain-text composer with live segment counting, an auto-appended STOP opt-out footer, and TCPA compliance guardrails. Sent through Modality's platform number (metered against SMS credits) or your own connected Twilio.
- Social, Instagram, Facebook, X, LinkedIn, and TikTok posts composed alongside the same campaign, each with its own body limit and rate profile.
Native Sending vs Connected ESPs
When you create a campaign you choose how it will be delivered. This choice shapes the rest of the workflow, so it is worth understanding up front:
- Native (Modality), you build and send entirely inside Modality. This is the path the visual editor, AI Campaign Studio, template library, content screening, pre-send review, batching, and the analytics timeline all describe. Everything in this guide applies to native campaigns.
- Connected ESP (Brevo, Mailchimp, Klaviyo), Modality manages the audience and links out to your ESP for the actual send. The campaign detail page shows an "Open in {provider}" deep link, pulls merge tags from the ESP's API, and can use ESP-hosted content. Content screening, the native pre-send review, and native batching do not apply, those run in the ESP's own admin.
Broadcast vs Journey Campaigns
Independent of channel, every campaign is one of two types:
- Broadcast campaigns are one-time sends. You build the content, choose your audience, and send it immediately or schedule it for a specific date and time. Once sent, the campaign is complete and you can review analytics.
- Journey campaigns are automated, recurring sends. They can be triggered by automations (form submission, tag added, ticket purchased) or run on a schedule (daily, weekly, monthly, or custom cron expression). Journey campaigns stay active and continue sending to new people who match the trigger criteria.
You can convert between types at any time from the More menu on the campaign detail page. Converting a broadcast to a journey preserves all content and settings; you just need to configure a trigger.
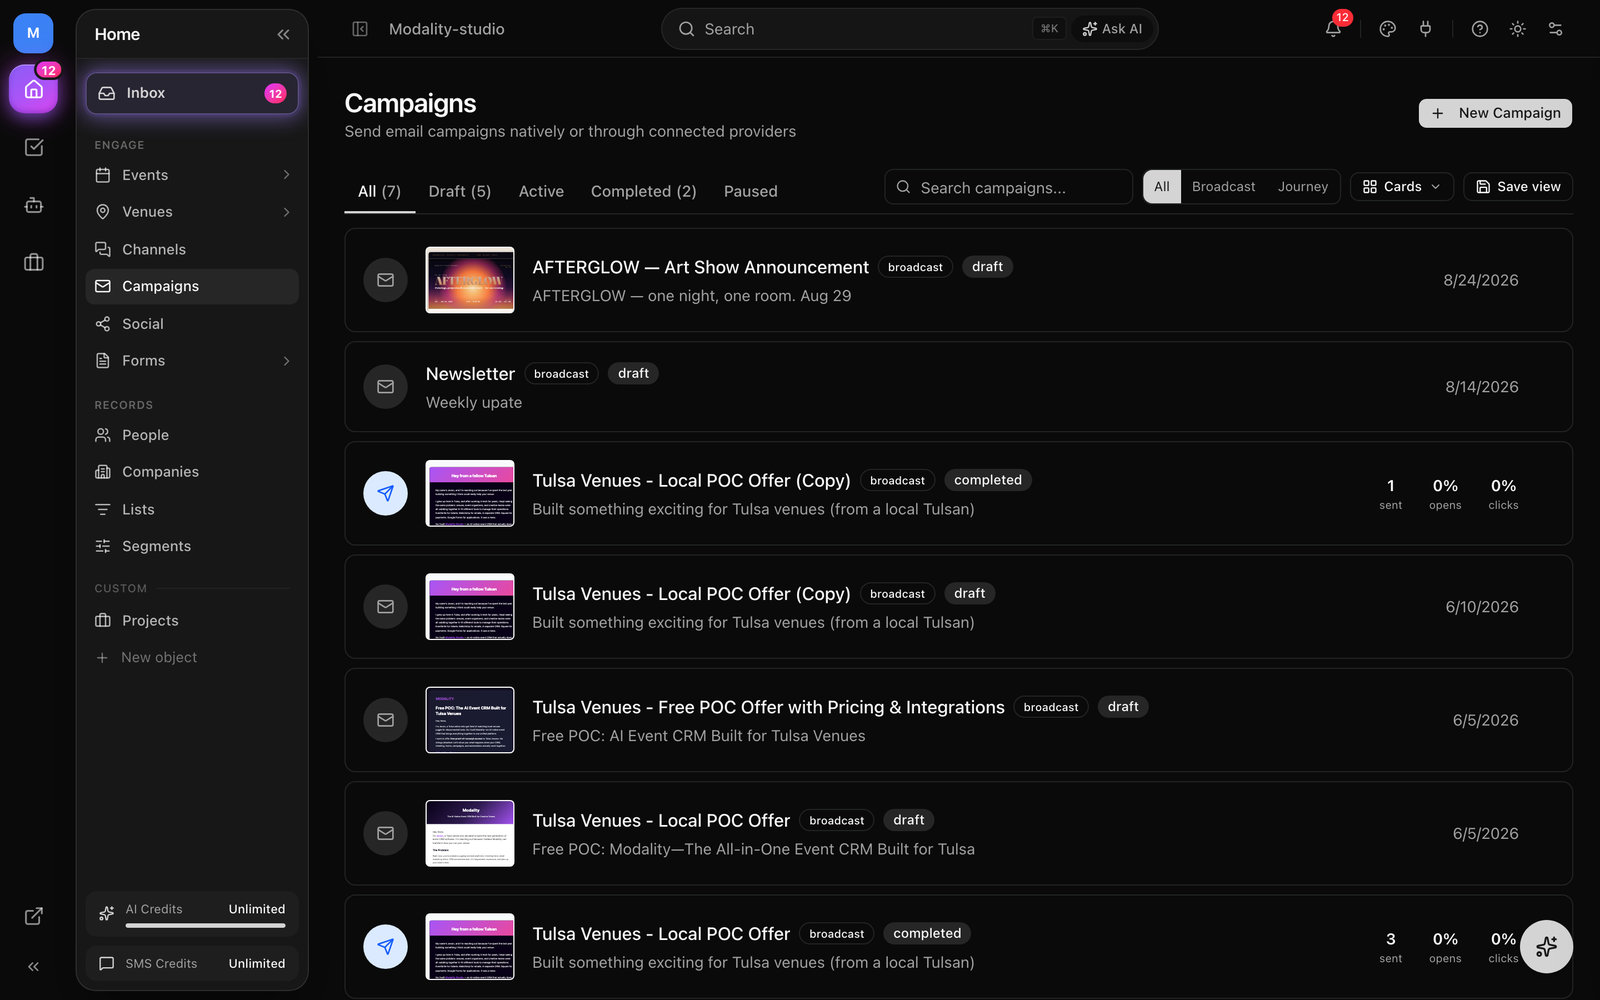
Creating a Broadcast Campaign
Follow these steps to create and send a broadcast campaign:
- 1
Navigate to Campaigns
Click "Campaigns" in the sidebar navigation. You will see all existing campaigns with their status, type, and provider.
- 2
Click "New Campaign"
The new campaign dialog appears. Enter a name (e.g., "Spring Event Announcement"), select "Broadcast" as the type, and choose delivery: Modality (native) or a connected ESP. See Native vs ESP above.
- 3
Choose your starting point
For native email campaigns the setup wizard appears with four options: start from scratch, generate with AI, pick a template, or paste HTML. See the next section for details on each.
- 4
Complete the checklist
The campaign detail page opens with a checklist guiding you through Sender, Recipients, Subject, and Design. Complete each section to unlock the Send button.
The Setup Wizard
After creating a native email campaign, the setup wizard gives you four ways to start building:
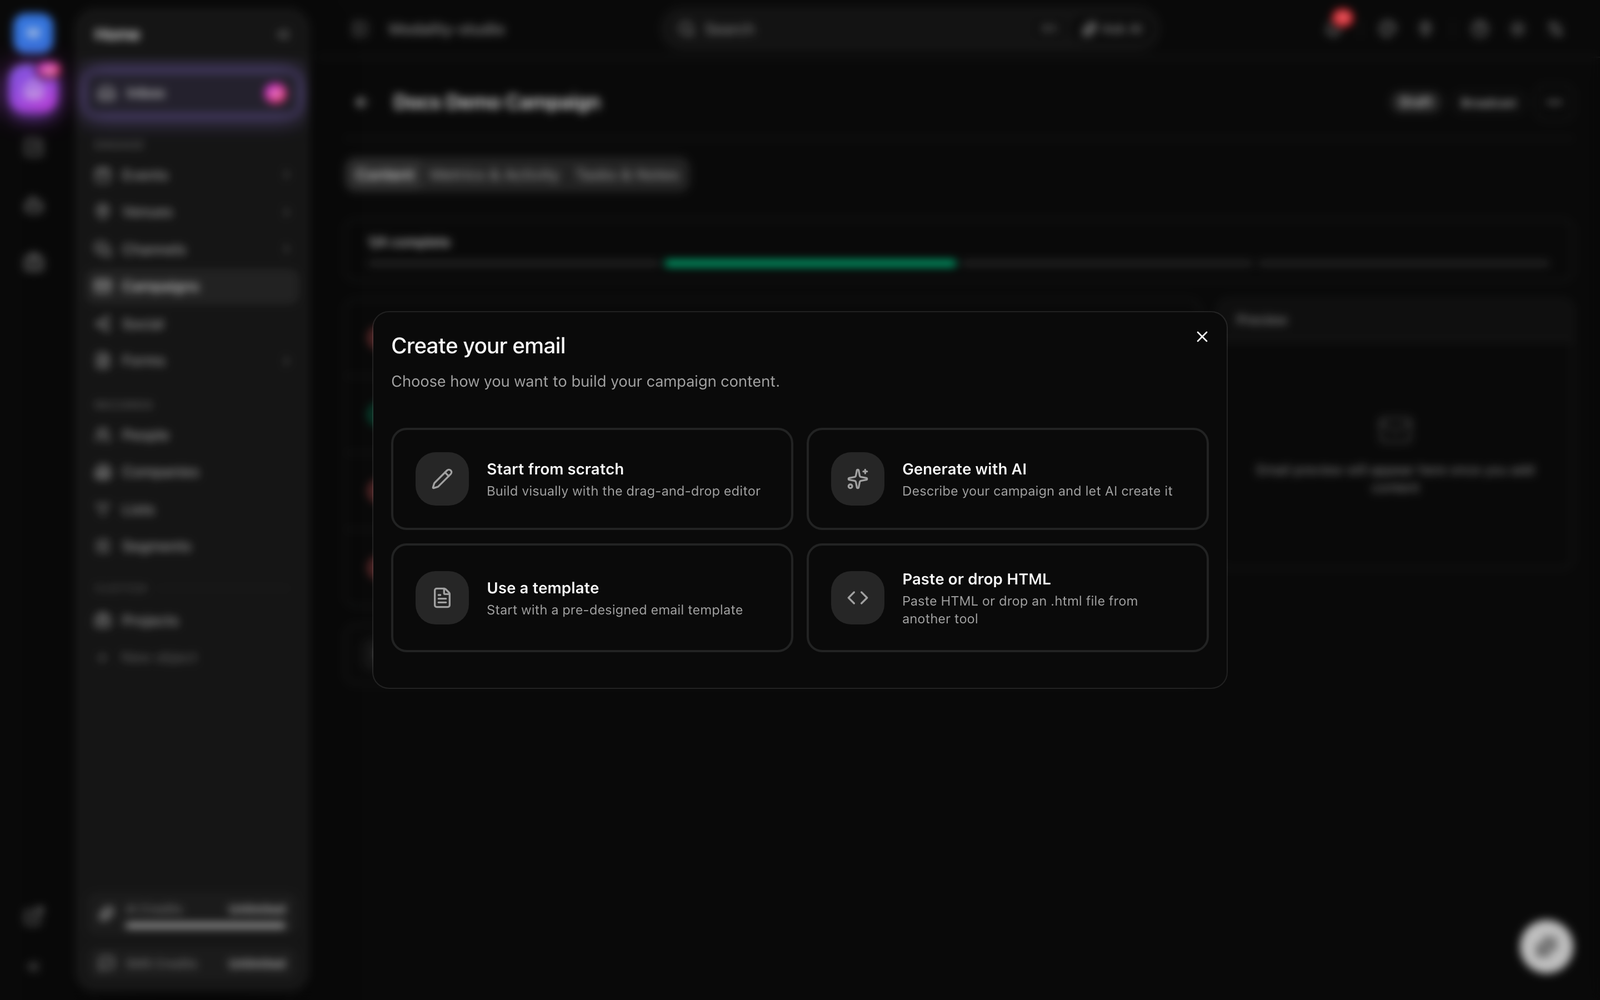
Start from Scratch
Opens the visual email editor with a blank canvas. You build your email block by block using the drag-and-drop editor. Best for custom designs that do not match any existing template.
Generate with AI Campaign Studio
Opens the AI Campaign Studio modal. Describe your campaign goal, select a tone, choose sections (hero, body, CTA, footer), and optionally link events from your workspace. AI generates a complete email using your brand kit assets. See the AI Campaign Studio section for a full walkthrough.
Choose from Template Library
Browse the built-in starter templates organized by category (welcome, newsletter, event, sales, transactional, minimal) alongside any templates your workspace has saved. Each shows a live preview. Click "Use Template" to load it into the editor, where you can customize every element. See Template Library.
Paste Existing HTML
Paste raw HTML from another email tool or export. Modality renders each original section for parity, showing a live preview alongside the code editor so you can verify the result before sending.
The Campaign Checklist
The campaign detail page uses a step-by-step checklist layout. A progress bar at the top shows how many sections are complete. Each section expands to reveal its configuration:
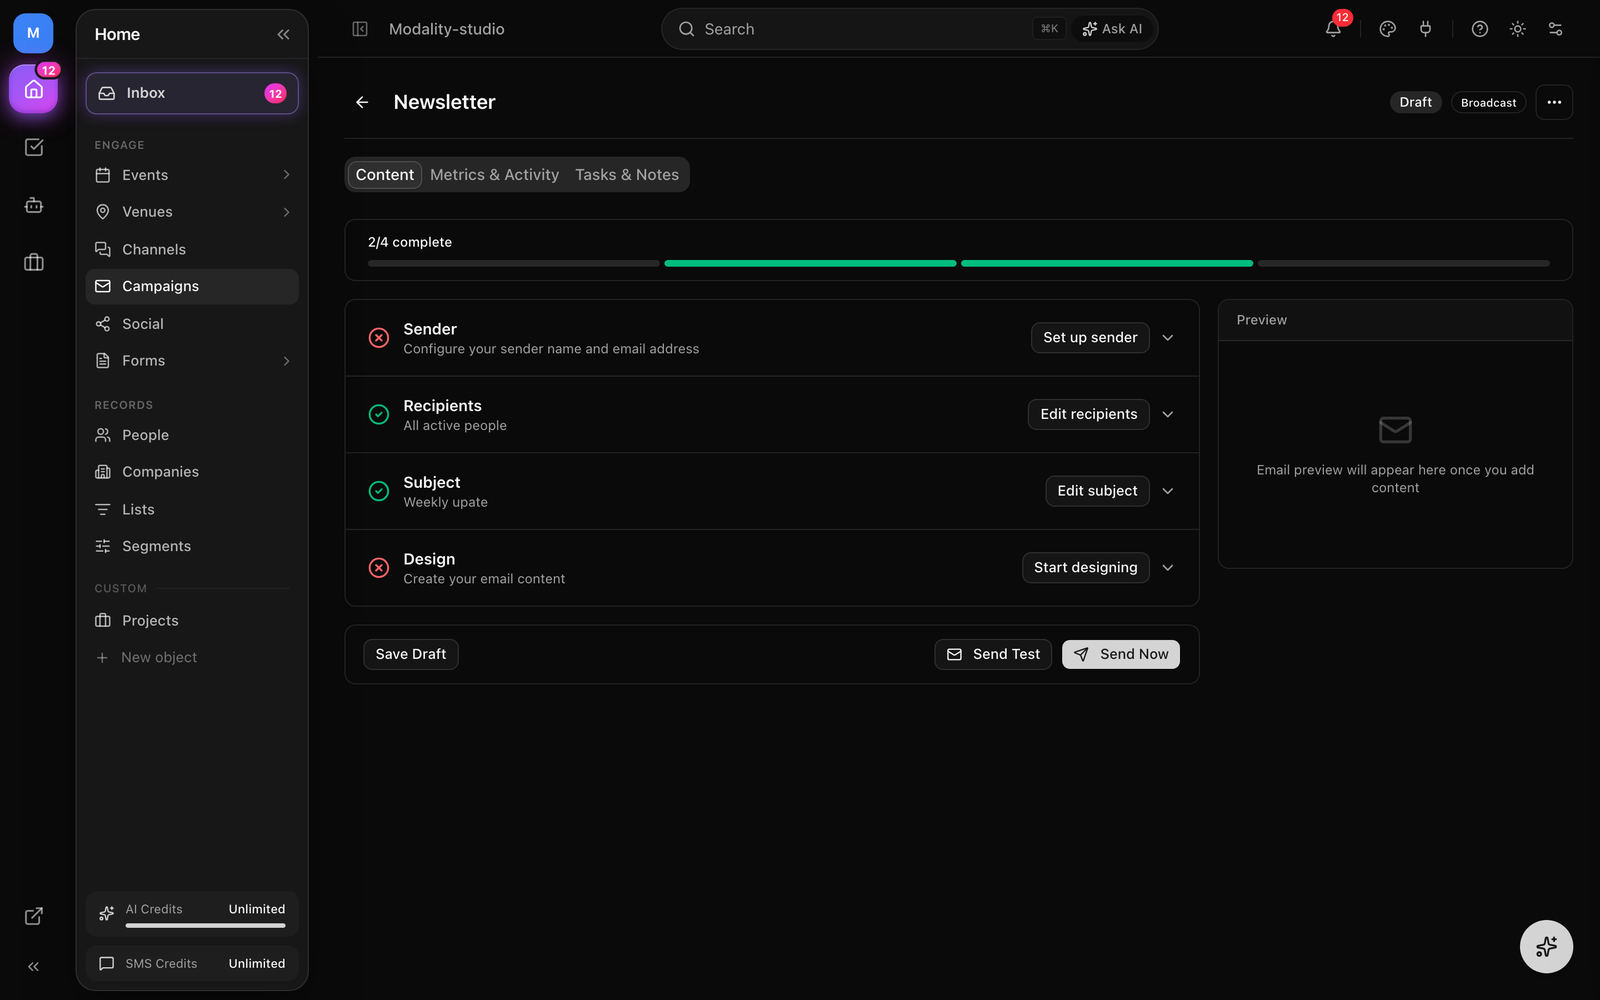
Sender
Configure the "From" name and email address, and an optional Reply-To. How the From address is actually used depends on domain verification, see Sending & Deliverability for the exact rule.
Recipients
Choose who receives the campaign. There are three targeting modes:
- All contacts, sends to every eligible person in your workspace (nothing selected)
- A specific list, a static contact list you curate or import into
- A dynamic segment, a saved rule set (e.g. "attended a show in the last 90 days") that is resolved live at send time, so the audience is always current
The recipient count updates in real time as you change selections. Regardless of mode, Modality automatically excludes anyone who is Unsubscribed, Bounced, or Inactive, and skips social-only placeholder contacts (handle-only leads whose email ends in @social.invalid). SMS sends additionally require a phone number and SMS consent.
Subject Line
Enter your subject line and optional preview text. Merge tags are supported (e.g., {{first_name}}). The preview panel on the right updates to show how the subject and preview text appear in an inbox.
Design
Shows the current email design status. Click "Edit Design" to open the visual editor, or "Change Design" to return to the setup wizard and choose a different starting point. A thumbnail preview of the current design appears in the checklist.
The Visual Email Editor
The email editor is a full-page, drag-and-drop builder. It consists of three panels:
- Left panel (Block palette), drag blocks onto the canvas: heading, paragraph, image, button, divider, spacer, social links, logo, and columns
- Center (Canvas), the live email preview where you arrange and edit blocks
- Right panel (Settings), block-specific settings appear when you select a block (colors, padding, alignment, link URL, etc.)
GIF: dragging a block from the left palette onto the canvas, editing its text inline with the floating toolbar, then inserting a merge-tag pill by typing {{ to open the dropdown.
Demo GIF / screenshot to be added
Working with Blocks
- Drag a block from the left palette onto the canvas. A blue insertion indicator shows where it will land.
- Click any block to select it. The right panel shows its settings.
- Drag the handle on the left edge of a selected block to reorder it.
- Click the trash icon on a selected block to delete it.
- For text blocks (heading, paragraph), click directly on the text to edit inline. A floating toolbar appears with bold, italic, underline, link, and alignment options.
Brand Colors in the Editor
Every color picker in the editor includes your brand kit colors as preset swatches. This ensures consistent branding without remembering hex codes. Colors are pulled from your Brand Kit settings (primary, secondary, accent, and navbar colors).
Save as Template
To reuse a design, click the Save as template tile in the editor toolbar. A dialog asks for a name and category, then stores it as a workspace template that appears alongside the built-ins in the template picker. See Template Library.
Merge Tags & Personalization
Merge tags insert per-recipient values into any text block or subject line. Click the merge tag button in the text toolbar or type {{ to open the dropdown. Every send path, campaigns, automations, sequences, and SMS, resolves the same tags identically.
Built-in Contact Tags
{{first_name}}, falls back to "there" when empty{{last_name}}{{full_name}}, falls back to "there" when empty{{email}}{{phone}}{{company}},{{job_title}},{{website}},{{instagram}}, contact profile fields{{unsubscribe_url}}, the recipient's one-click unsubscribe link (required for compliance)
Company & Custom-Field Tags
When a contact is linked to a company (Organization), you can pull its fields with dotted tags:
{{company_name}}/{{company.name}}, the linked company's name{{company.domain}}, the company's domain{{company.<key>}}, any custom field stored on the company
Any custom field you have defined on a contact is also addressable directly as {{custom_key}}, the tag key is the field's key. Custom keys are allowed by design and are not validated against a fixed schema.
User-Defined Merge Tags
Use the editor's + New merge tag builder to bind a friendly {{key}} to any specific field, a contact column, a contact custom field, or a linked company field. This gives you a memorable tag (e.g. {{loyalty_tier}}) without exposing the underlying field key. New keys can't collide with a built-in reserved tag or an existing definition.
Default (Fallback) Values
Add a fallback to any tag with the default filter so an empty value never leaves a blank:
{{first_name | default:'there'}}{{company | default:'your team'}}
Merge tags render as colored pills in the editor. Switch to the Preview tab to see them replaced with sample data.
{{unsubscribe_url}} merge tag in a button or text link; AI- and template-generated emails auto-append a compliant footer when you don't.Dynamic Content Blocks
Unlike scalar merge tags, a dynamic block renders a whole section of workspace content once per send. The shipped block is {{upcoming_events}}, which pulls your workspace's upcoming published events (with a future start date) into the email as a styled, email-safe list of show titles, dates, venues, and ticket links.
It accepts optional parameters to tune the window, count, and styling:
{{upcoming_events}}, default: next 90 days, up to 10 events{{upcoming_events days=30}}, only events in the next 30 days (1–730){{upcoming_events days=60 limit=6}}, window plus a cap (up to 25){{upcoming_events theme=dark accent=#C7A86A}}, dark styling with a custom accent color
The block is resolved once at the workspace level when the campaign sends, before per-recipient scalar tags. If there are no upcoming events in the window, it renders a graceful "more shows announced soon" line.
Screenshot: a rendered {{upcoming_events}} block inside the email preview, showing several event rows with date, title, venue, and a Tickets button.
Demo GIF / screenshot to be added
AI Campaign Studio
The AI Campaign Studio generates complete, brand-consistent email campaigns from a text description. Here is how to use it step by step:
GIF of the AI Campaign Studio modal: describe the goal, pick tone and sections, click Generate, switch between the three A/B variants, and load the chosen one into the editor.
Demo GIF / screenshot to be added
- 1
Select campaign type
Choose from: event announcement, newsletter, promotional offer, follow-up, thank you, or custom. This guides the AI's content structure and tone.
- 2
Describe your goal
Write a brief description of what the email should accomplish. For example: "Announce our upcoming summer festival with early bird pricing and lineup reveal."
- 3
Choose tone and sections
Select a tone (professional, casual, urgent, playful, etc.) and pick which sections to include: hero image, intro paragraph, event details, CTA button, social links, footer.
- 4
Link events (optional)
Select events from your workspace to pull in real data: event name, date, venue, ticket types, and pricing. This data is woven into the generated content.
- 5
Generate and review
Click Generate. The AI produces the email using your brand kit (logo, colors, fonts) and returns a live preview, with A/B variants you can switch between. A compliant unsubscribe footer is auto-added if the content omits one. Regenerate with adjusted settings, or load the result into the visual editor for manual refinement.
Creating Campaigns from Chat
Beyond the in-editor Studio, the AI assistant can build a campaign from a template right in chat. It exposes two tools:
- List templates, the assistant can look up your saved and built-in templates by name (e.g. find a branded "Show Spotlight" template)
- Create a campaign from a template, it seeds a draft broadcast from that template and, if you name an event, merges the event's title, date, venue, and ticket link into the template's placeholders (
[Event Name],[Date],[Venue],[Doors…], and the event URL)
For example, ask: "Use the Show Spotlight template to create a campaign for the Belafonte show." The assistant matches the template, fills in the event details, appends an unsubscribe footer, and links you to the new draft to review and send.
GIF of the AI chat flow: typing 'use the Show Spotlight template to create a campaign for <event>' and the assistant returning a linked draft campaign to open.
Demo GIF / screenshot to be added
Template Library
Modality ships 12 built-in starter templates to jumpstart your email design:
- Simple Welcome, clean welcome email for new subscribers
- Personal Welcome, warm, personal welcome from a founder
- Clean Newsletter, simple newsletter with header, articles, and CTA
- Event Invitation, clean event invitation with details and RSVP
- Event Reminder, reminder email sent before an event
- Artist Announcement, spotlight a performer or lineup reveal
- Tickets On Sale, announce that tickets are now available
- Ticket Confirmation, confirm a ticket purchase with the details
- Sales Follow-up, professional follow-up after a meeting or demo
- Order Confirmation, confirm a purchase or order
- Plain Text Style, no frills, just text, highest deliverability
- Announcement, bold announcement with a single CTA
Built-in templates are read-only starting points, they can't be edited or deleted. To make your own, open any campaign's email editor and click the Save as template toolbar tile. Your saved templates appear alongside the built-ins in the picker and can be edited or removed at any time.
SMS Campaigns
The SMS composer lives right on the campaign detail page. Type your message in plain text and use the Insert Merge Tag menu to personalize it ({{first_name}}, {{full_name}}, etc.); custom-field tags resolve too. As you type, a live counter shows the character count, the segment count, and the encoding.
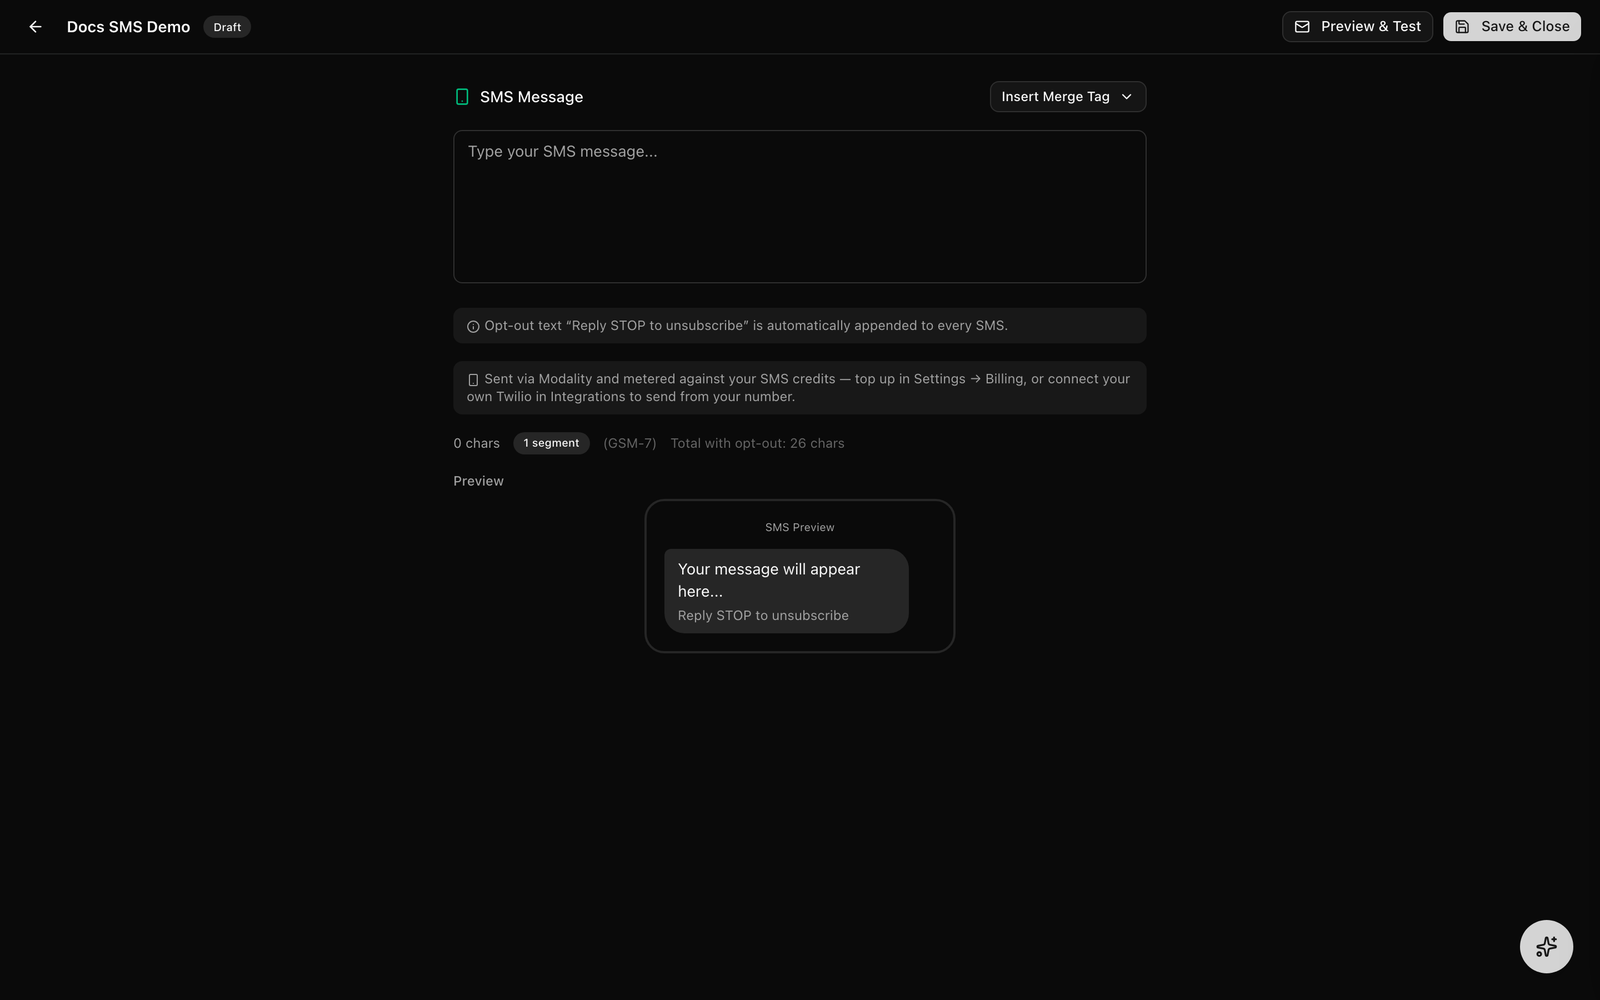
Segments & Encoding
SMS is billed by segment, and how many characters fit in a segment depends on the encoding:
- GSM-7 (standard characters), 160 characters per segment (153 in a multi-part message)
- UCS-2 (any emoji or non-GSM character), 70 characters per segment (67 multi-part)
Adding a single emoji switches the whole message to UCS-2 and more than halves the per-segment length, so the counter is worth watching. The counter includes the opt-out footer in its total.
The STOP Opt-Out Footer
"Reply STOP to unsubscribe" is automatically appended to every SMS you send, you don't add it yourself, and it's counted in the segment total shown in the composer.
Credits vs Your Own Twilio
There are two ways to send:
- Via Modality (platform Twilio), the default. Messages send from a Modality number and are metered, by segment, against your plan's monthly SMS credits: Free 50, Pro 1,000, Business 5,000, Enterprise 25,000. When you run low, buy an SMS pack in Settings → Billing.
- Bring your own Twilio, connect your Twilio account in Integrations to send from your own number. These sends bill on your Twilio account and are not metered against Modality credits.
Compliance Guardrails
Two TCPA-aligned guardrails run on every SMS campaign:
- Quiet hours, sends are blocked between 9pm and 8am. If you try to send during quiet hours, Modality asks you to schedule it for later instead.
- Frequency cap, a maximum of 6 SMS per contact per month. Contacts already at the cap are silently skipped (and counted as skipped in the results) so no one is over-messaged.
SMS also only goes to contacts who have a phone number and SMS consent, the audience is filtered to SMS-eligible people automatically.
Multi-channel & Omnichannel Sends
A campaign can target more than one channel at once. Beyond email and SMS, Modality supports social channels, Instagram, Facebook, X, LinkedIn, and TikTok, composed with the social composer on the same campaign. When you send, the message fans out across every channel you enabled, sharing the one audience and merge-tag layer.
Each channel has its own body limit and delivery pace:
- Email, batched at 50 per batch, ~4/sec
- SMS, 1 message/sec (long-code limit), 1,600-character body ceiling
- Instagram / TikTok, 2,200-character bodies, tight daily caps
- X, 280 characters
- Facebook, long-form bodies, ~200/day
- LinkedIn, 3,000 characters, ~100/day
Each channel also has its own monthly plan limit, and combined multi-channel analytics roll up delivery across channels so you can compare reach in one place.
Test, Duplicate & Convert
Send a Test Email
Before sending for real, open the Send Test Email dialog and enter one or more addresses. Modality delivers the campaign exactly as recipients will see it, with merge tags resolved against sample data, so you can proof it in a real inbox. This is a standard pre-send step for any native email campaign.
Duplicate as Draft
Use Duplicate as Draft from the More menu to copy a campaign's content and settings into a fresh draft, handy for recurring newsletters or reusing a proven layout for the next event.
Convert Broadcast ↔ Journey
Also from the More menu, convert a broadcast into a journey (or back). Content and settings are preserved; converting to a journey just needs a trigger, and converting back removes any linked automation.
Pre-Send Review & Content Screening
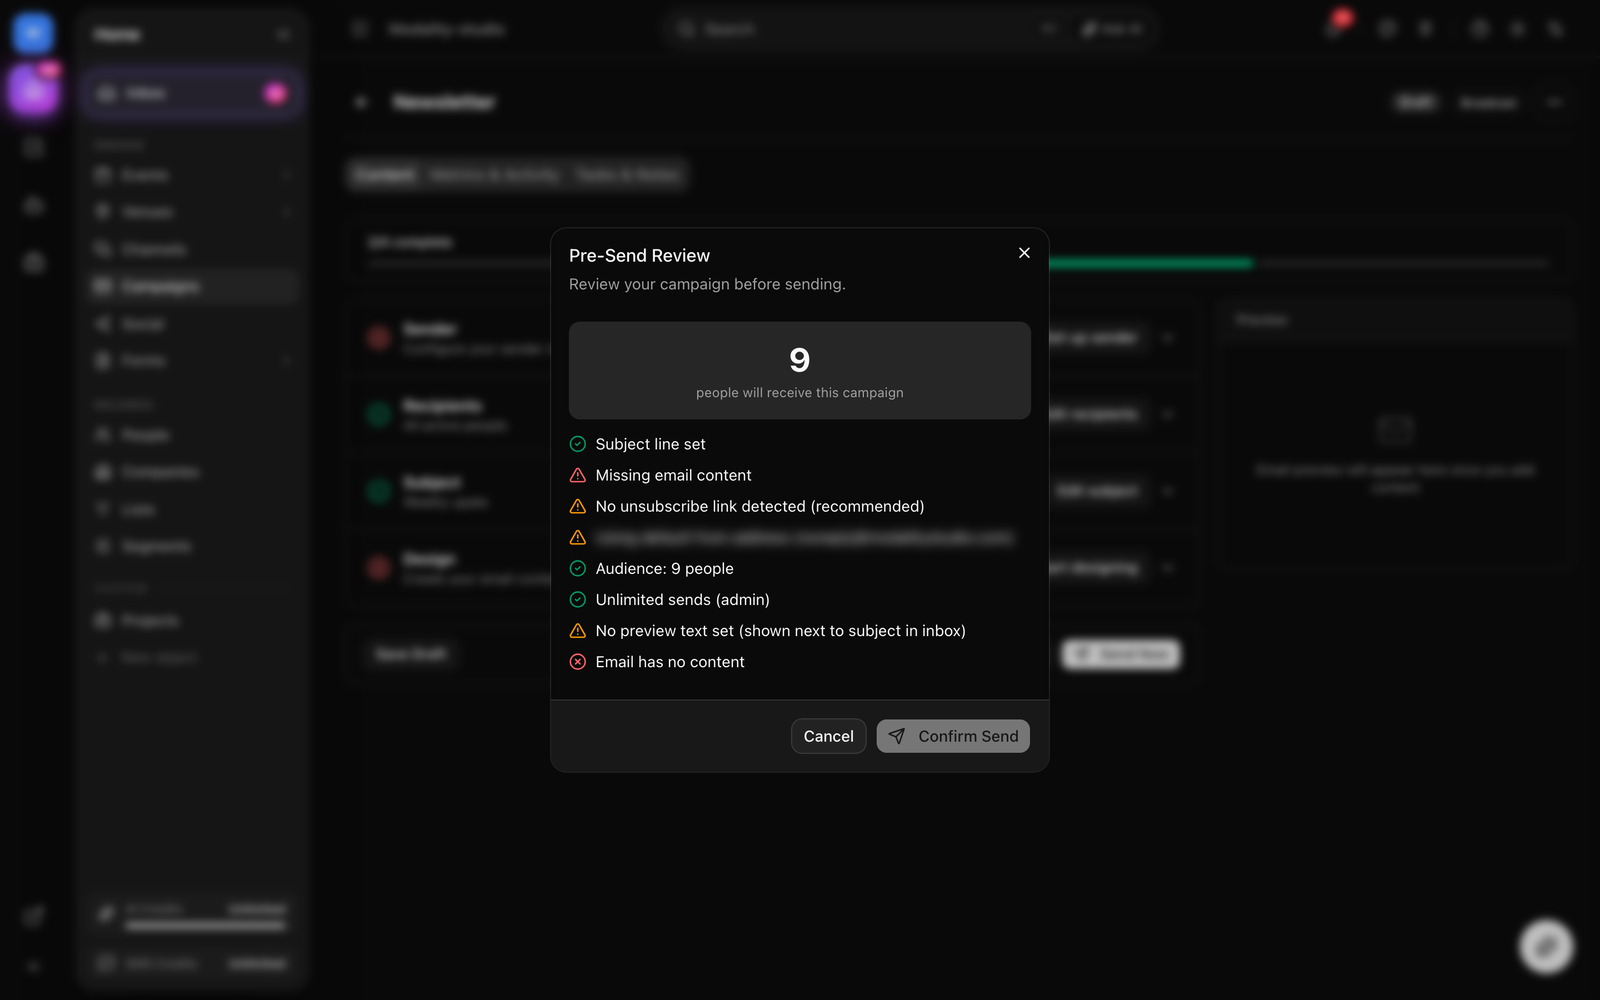
Before a native email campaign sends, Modality runs a preflight check and shows the results in the pre-send review dialog. Screening findings fall into two levels:
- Errors block the send until fixed.
- Warnings are advisory, you can review and send anyway.
Errors (block the send)
- Empty content, the email has no body
- Empty subject, the subject line is blank
- Missing unsubscribe link, no
{{unsubscribe_url}}or the word "unsubscribe" anywhere in the email (required by CAN-SPAM and GDPR)
Warnings (advisory)
- Spam trigger phrases, flags known spammy phrases like "act now," "click here," "risk free"
- High promotional density, too many soft-sell words (free, sale, hurry…) relative to length
- Long subject, over 150 characters (most inboxes show 50–60)
- ALL CAPS subject, an entirely uppercase subject line
- Excessive exclamation marks, three or more "!" in the subject
- Low text-to-image ratio, mostly images with little text
- Too many links, more than 15 links
- Very short content, under 20 words
- Large email, over 100KB (Gmail may clip it)
- Missing image alt text, images without
altattributes - Malformed / unclosed merge tag, a tag with bad syntax or a missing
}}. Note: this only flags syntax, any well-formed{{identifier}}(including custom fields and the{{upcoming_events}}block) is treated as valid and is not checked against a schema.
Deliverability Health
The dialog also displays your sender reputation based on a rolling window:
- Green, healthy bounce and complaint rates
- Amber, elevated bounce or spam-complaint rate
- Red, high bounce or spam rate; sending may be restricted
Audience & Send Limits
The review shows the final recipient count after exclusions, and checks it against your plan's included monthly marketing sends (Free: 500, Pro: 10K, Business: 50K). Unlike a hard cap, exceeding the included quota does not automatically block the send: if your workspace has a card on file, the overage is metered and auto-billed, and the dialog shows the estimated overage cost. Only workspaces that can't auto-charge are stopped at the quota with an upgrade prompt. SYSTEM_ADMIN and VIP workspaces are exempt from metering entirely.
Sending & Scheduling
Once the checklist is complete and the pre-send review passes, you have two options:
Send Immediately
Click "Send Now." Native email is sent in batches of 50 at roughly 4 messages per second to protect deliverability, with progress visible on the campaign detail page.
Schedule for Later
Click the dropdown arrow next to Send and select "Schedule." Pick a date and time in your workspace timezone. Scheduled campaigns show a "Scheduled" badge with the send time. You can edit or cancel a scheduled campaign at any time before the send window.
Sending & Deliverability Details
How the From Address Works
Your chosen From address is only used as the actual sender when it's on a verified sending domain in your workspace. If you pick an address on an unverified domain (for example a personal gmail.com address), the email sends from Modality's verified default address instead, and your chosen address becomes the Reply-To, so replies still reach you and the email still reads as coming from your organization. To send truly as your own domain, verify it under Settings → Domains.
Reply Routing
When inbound email is configured, replies are routed into your workspace communications inbox, and every outbound send is mirrored into the unified inbox so the whole conversation lives on the contact's record.
Idempotent, Resumable Sends
Native email sends are safe to retry. Modality logs each recipient as it's sent, and skips anyone already marked sent for that campaign. If a send is interrupted (a timeout, a deploy, a dropped connection), clicking Send again resumes where it left off, it will not re-email the whole audience or re-charge your send meter. Only queued or failed recipients are retried.
Campaign Analytics
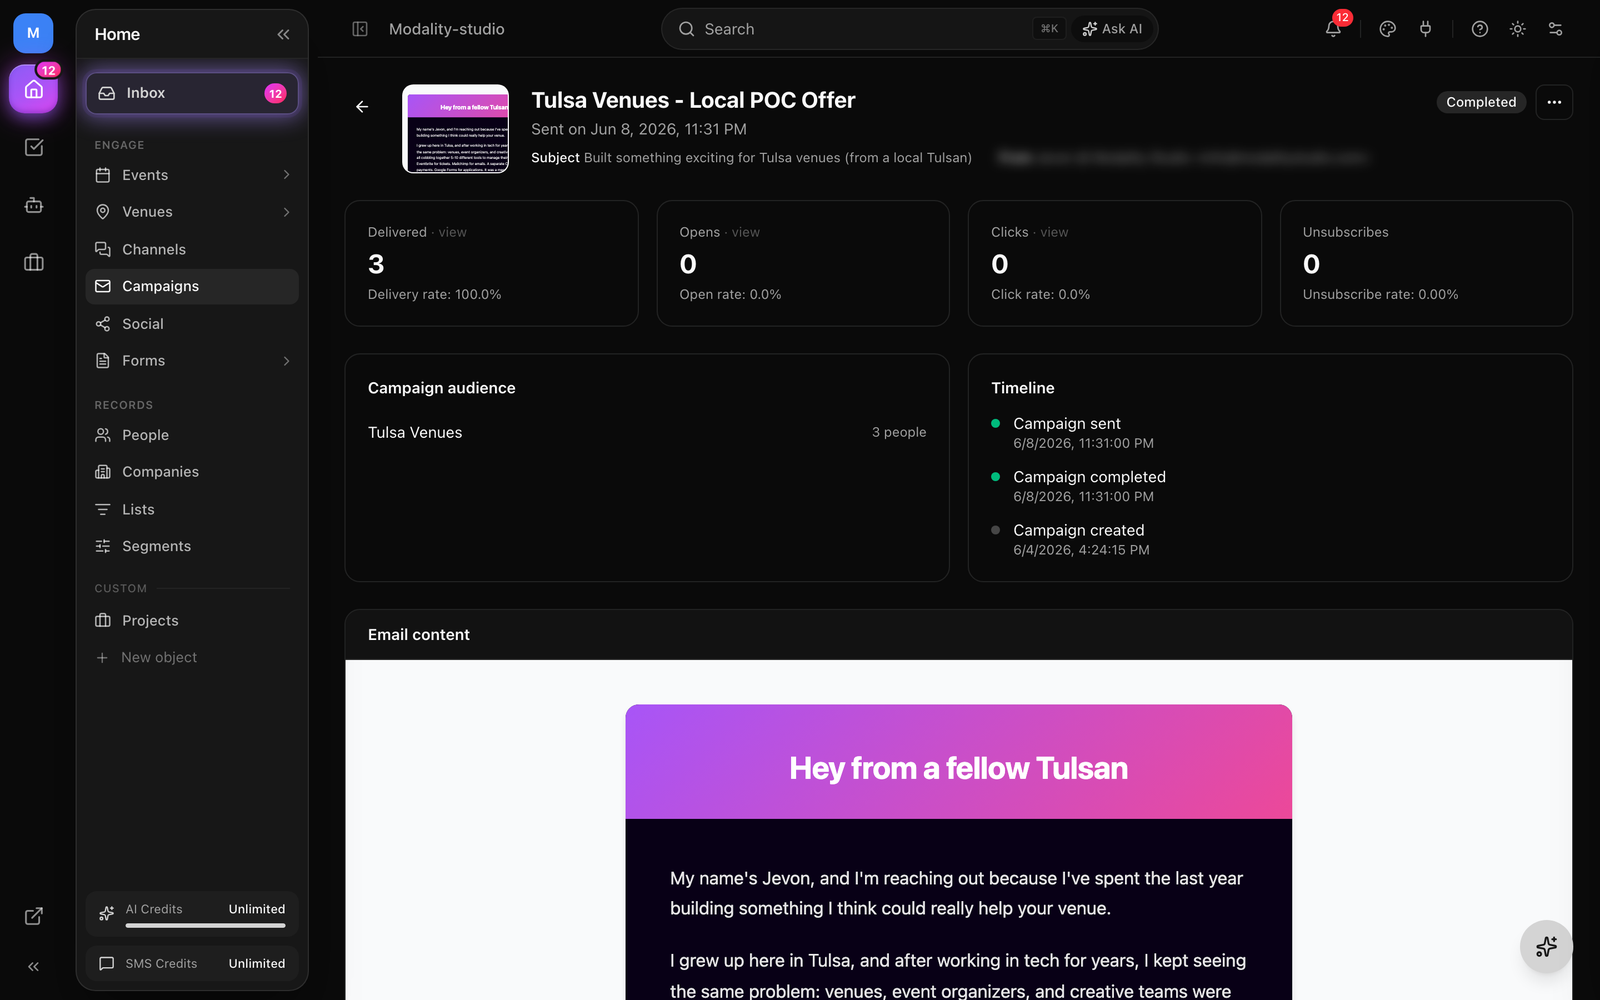
After a campaign is sent, the detail page transforms into an analytics dashboard. Email metrics update in near real-time via provider webhooks.
Performance Metrics
- Delivered, number and percentage of emails successfully delivered
- Opened, unique opens with open rate percentage
- Clicked, unique clicks with click-through rate
- Unsubscribed, people who unsubscribed via this campaign
- Bounced, hard and soft bounces
- Spam complaints, recipients who marked the email as spam
Activity Timeline
Below the metrics cards, a chronological activity feed shows individual events: deliveries, opens, clicks (with the clicked URL), bounces, and unsubscribes. Each entry links to the person's record in the CRM.