Deliverability & Domains
Getting your email into the inbox, not the spam folder, comes down to two things: proving you own the domain you send from, and keeping a clean sending reputation. This guide covers adding and verifying a custom sending domain (SPF & DKIM), how the From address is chosen at send time, bounces and the automatic suppression list, and the Deliverability Health dashboard.
How Sending Works
Out of the box, campaign and transactional email leaves from Modality's own verified address (for example noreply@modalitystudio.com), shown to recipients with your workspace name. That works immediately and requires no setup. Adding your own sending domain lets email come from an address on your domain, like hello@yourdomain.com, which builds brand trust and lets you own your own sender reputation instead of sharing the platform default.
Before a mailbox provider (Gmail, Outlook, Yahoo) will trust mail claiming to be from your domain, you must prove you control that domain by publishing DNS records. That's what domain verification does.
Custom Sending Domains
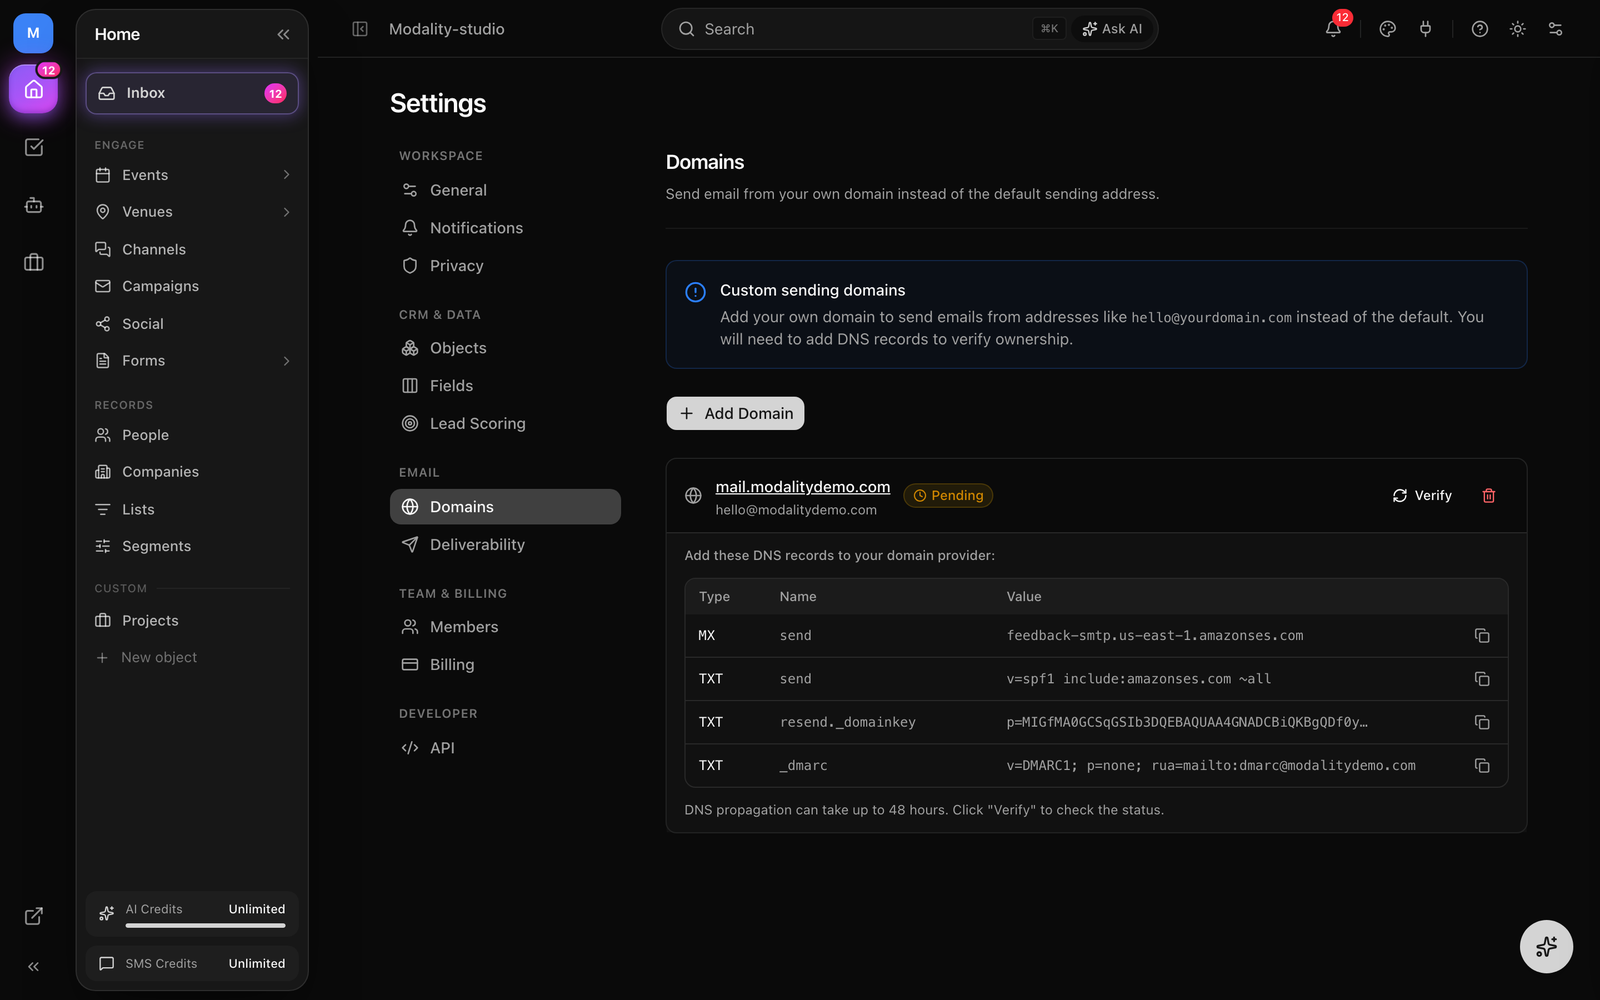
Add a domain under Settings → Domains. When you add a domain, Modality registers it with the email provider and returns the exact DNS records you need to publish. You then add those records at your DNS provider (the registrar or host where your domain's DNS lives, e.g. Cloudflare, GoDaddy, Namecheap, Route 53).
How to Add and Verify a Domain
- 1
Open Settings → Domains
You'll see the "Custom sending domains" panel. Adding domains requires an admin (owner/admin) role, and the feature is available on the Business plan.
- 2
Click "Add Domain"
Enter your domain. You can use a root domain (
yourdomain.com) or, commonly, a dedicated subdomain for mail such asmail.yourdomain.com. A subdomain keeps your marketing sending reputation separate from any other mail on your root domain. - 3
Copy the generated DNS records
After the domain is added it appears in the list with a Pending badge. Expand it to see the DNS records table, each row has a Type, Name, and Value, with a copy button on the value.
- 4
Publish the records at your DNS provider
Add each record exactly as shown at your registrar/DNS host. These typically include a DKIM record (a
TXT/CNAMEthat carries your signing key), an SPF-relatedMX/TXTrecord for the return-path, and sometimes aDMARCrecord. Copy values verbatim, a single altered character will fail verification. - 5
Click "Verify"
Back in Modality, click Verify on the domain. Modality re-checks the domain's status with the provider and updates the badge. If records haven't propagated yet, you'll see a note that DNS can take up to 48 hours, just check again later.
Domain Status Badges
- Pending, the domain is registered but DNS records aren't confirmed yet. Publish the records and click Verify. Propagation can take up to 48 hours.
- Verified / Active, DNS checks pass and the domain is ready to send from. Only a verified domain can be used as your campaign From address (see below).
- Failed, verification could not confirm the records. Re-check that each record's Name and Value match exactly, then Verify again.
SPF, DKIM & What the Records Do
The DNS records you publish are how mailbox providers authenticate your mail. You don't have to be an expert, Modality generates them for you, but it helps to know what each one is for:
- SPF (Sender Policy Framework), a DNS record that lists which servers are allowed to send mail for your domain. It lets a receiver confirm the sending server is authorized, not a spoofer.
- DKIM (DomainKeys Identified Mail), a cryptographic signature added to every message. The matching public key lives in your DNS, so receivers can verify the message really came from your domain and wasn't altered in transit.
- DMARC, an optional policy record that tells receivers what to do with mail that fails SPF or DKIM, and where to send reports. Publishing a DMARC record strengthens your alignment and is recommended by Gmail and Yahoo for bulk senders.
When SPF and DKIM both pass and align with your From domain, providers treat your mail as authenticated, the single biggest factor in reaching the inbox rather than spam. This is why sending from a verified custom domain outperforms an unauthenticated free address.
How the From Address Is Chosen
A message can only be sent from a domain the provider is verified to send for, an unverified or free address (like a gmail.com sender) is rejected. Modality enforces this automatically at send time so your campaigns never bounce on a bad From:
- If your chosen From address is on one of your workspace's verified sending domains, it is used as the actual From, recipients see mail from your own address.
- If your chosen From address is not on a verified domain (for example a personal Gmail), Modality sends from the platform's verified default instead, and sets your chosen address as the Reply-To, so replies still reach you and the message still reads as coming from the organizer.
- When no custom From is set, mail sends from the platform default and replies route into your workspace comms inbox (when inbound email is configured).
hello@yourdomain.com, first verify yourdomain.com under Settings → Domains. Until it's verified, campaigns still go out, just from the Modality default address with your name.Sender Reputation
Authentication gets you in the door; reputation keeps you there. Mailbox providers score every sender on how recipients react to their mail. Two signals matter most, and Modality tracks both per workspace:
- Bounce rate, the share of messages that couldn't be delivered (invalid or non-existent addresses). High bounce rates signal a stale or purchased list and hurt your standing.
- Complaint rate, the share of recipients who mark your mail as spam. Even a small complaint rate is a strong negative signal.
Modality applies thresholds aligned with industry and provider standards. Bounce rate is flagged warning at 3% and critical at 5%; complaint rate is flagged warning at 0.05% and critical at 0.1%. To avoid noise on tiny samples, warnings only surface once you've sent a meaningful volume (at least 50 emails) in the window.
Habits That Protect Your Reputation
- Only email people who opted in, captured through forms, RSVPs, ticket purchases, or your own imports.
- Keep your list clean; remove addresses that repeatedly bounce (Modality does this for you, see below).
- Every campaign includes a one-click unsubscribe. Modality adds the
List-UnsubscribeandList-Unsubscribe-Postheaders so recipients can leave in one tap instead of reporting spam. - Send relevant content at a sustainable cadence; sudden spikes to cold lists trigger filtering.
Bounces & the Suppression List
Modality automatically protects your reputation by suppressing addresses that go bad. Delivery events flow back from the email provider via webhook and update each contact's status, so you never have to prune your list by hand:
- A message bounces → the contact is marked
BOUNCEDand moved to the suppression list. They won't receive future campaign sends. - A recipient files a spam complaint → the contact is marked
UNSUBSCRIBEDand is likewise excluded from future sends.
When you send a campaign, the audience is filtered before fan-out: contacts whose status is BOUNCED, UNSUBSCRIBED, or INACTIVE are dropped automatically, along with non-deliverable placeholder addresses (such as social-captured handle-only leads). The suppression list is the safety net that keeps a single bad send from dragging down every future one.
Deliverability Health Dashboard
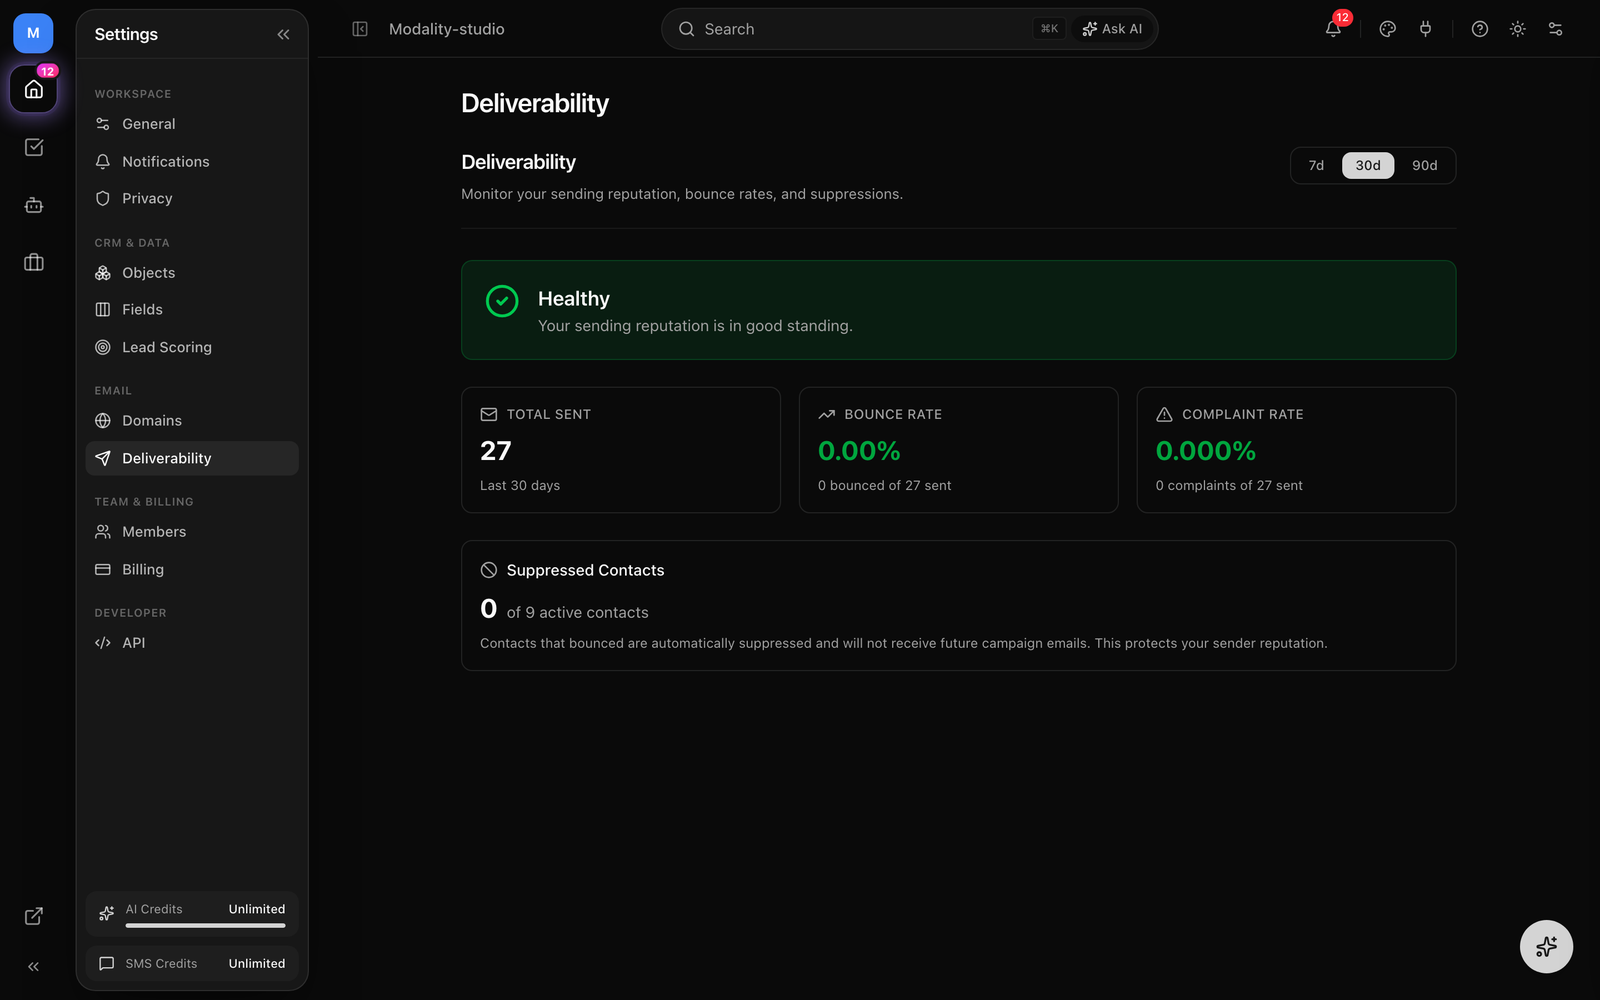
Settings → Deliverability gives you an at-a-glance view of your sending reputation. It's informational, a monitor, not a control panel, so you can catch problems before providers do. Pick a lookback window of 7, 30, or 90 days at the top right.
What the Dashboard Shows
- Overall status, a single Healthy, Warning, or Critical banner summarizing the period.
- Total Sent, how many emails went out in the window.
- Bounce Rate, percentage bounced, color-coded green/yellow/red against the 3% / 5% thresholds.
- Complaint Rate, percentage of spam complaints, against the 0.05% / 0.1% thresholds.
- Warnings, plain-language guidance whenever a metric crosses a threshold (e.g. "clean your contact list" or "add clear unsubscribe links").
- Suppressed Contacts, how many contacts are suppressed, shown against your active-contact count.
- Recent Bounces, a table of the latest bounced messages, with the recipient address redacted for privacy, plus subject, template, and date.
Reading the Signals
If the banner is green, keep doing what you're doing. A yellow warning means a metric is approaching the danger zone, a good moment to review your list quality and unsubscribe visibility. A red critical status means providers may already be filtering or throttling you; pause cold sends, clean your list, and only email engaged, opted-in contacts until the rates recover.